Please note, the rules, point values, modifiers etc., are still being tinkered with, so all of those that you see mentioned here might not be exactly what's used in the final version. The general mechanics of game play should however remain the same.
The rules can be played one on one, or with teams of multiple players on each side. In general, each player commands a Brigade consisting of 25 points worth of troops. Brigades are usually comprised of troops from one of the four main factions: Munckins, Winkies, Gillikins, or Quadlings, and these can be supplemented with an assortment of allied troop types.
 |
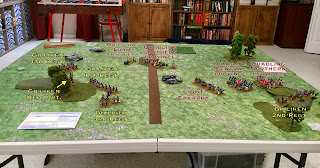
| A view of the set up. Note the cellphone on the tripod in the foreground. You can see my face on the screen. |
We did the Meeting Engagement scenario from the rulebook again, and adopted the random set up system I used for my game week ago, Another Ozz Battle Report, where each side rolls a d6 for each unit and that determines the order of set up numerically, in line, working left to right, low numbers to high, along the table edge. Like my last report, the table layout was created by us both randomly rolling from the 20 map halves presented in the rulebook, and each selecting which of the long edges of our half we wished to enter on.
Gillikin Brigade
1) Brigade Commander, generic 0 point
2) 1st Regiment 5 points
3) 2nd Regiment 5 points
4) 3rd Regiment 5 points
5) 4th Regiment 5 points
6) Medium Artillery 5 points
Total: 25 points
Quadling Brigade
1) Brigade Commander, generic 0 points
2) South. Prov. Regiment 5 points
3) Cent. Prov. Regiment 5 points
4) North. Prov. Regiment 6 points
5) Light Cavalry 5 points (Note: We used a Munchkin unit for this, as Buck didn't have a Quadling one, but we used the Quadling stats for it.)
7) Light Artillery 4 points (Note: We used a Winkie model for this, as Buck didn't have a Quadling one, but we used the Quadling stats for it.)
Total: 25 points
 |
| My view from my laptop. With my Gilliken player reference sheet at hand. |
We rolled for our set up locations, and I ended up with my Gilliken Regiments spread out, with two on each side of the road that subdivided the battlefield, and my artillery on the far left. Buck ended up with his Quadling units all clumped together, and a couple stacked up behind each other, on one side of the road. I hoped that would hinder his shaking out in a line and perhaps gain me a small advantage. His artillery ended up on his right flank. We both started our units in column to get a jump on claiming a maneuver advantage as we raced for the benefits offered by the limited cover on the field.
Briefly, activation is handled in the following way: each Brigade Commander has a pool of d6 dice, one for each unit in his command. At the beginning of the turn these are rolled and placed by the leader in a dice pool for each unit within his command radius. Each unit that is out of command radius rolls its d6 individually and places it by the unit's leader. A deck containing cards numbered 1-6 in red and 1-6 in black is then shuffled and placed on the table face down. Play begins with flipping cards one at a time. As the card numbers are revealed, if the commander has a die with that number, he can assign it to one of his units, and that unit can activate. In cases where both sides have units with the same number in close proximity, each side should be assigned a color (red or black) at the beginning of the game, and what ever color the card is is the side that goes first. (For my game I assigned Red to the Winkies and Black to the Munchkins.) Movement is a set amount, plus the amount of the highest of a 2d10 dice roll.
Like my previous reports, Buck took photos of the table at the halfway point (after 6 activation cards were drawn) and the end of each turn.
(Click any photo to view larger)
 |
| Beginning set up positions. |
 |
| End of Turn 1, Part 1 |
 |
| End of Turn 1, Part 2 |
 |
| End of Turn 2, Part 1 |
Over on my far right, the 2nd Regiment performed their mission excellently. The Quadlings attempted a charge, but were unable to close; and after exchanging a few rounds of ineffective musketry, both sides fell back.
 |
| End of Turn 2, Part 2 |
Over on the right, however, things were working beautifully, and Buck committed the Central Province Regiment to join in the pursuit of the elusive 2nd Gilliken Regiment. Through a fluke of unlucky dice rolling, neither enemy Regiment was able to come to grips with my Gillikens, though musketry was exchanged through the trees on a couple occasions.
 |
| Turn 3, Part 1 |
 |
| Turn 3, Part 2 |
With the situation as it was, I conceded defeat. With only one good Regiment left on the field along with my Artillery, and the enemy Cavalry ranging free, there was little hope for victory. It was a fun game, and I think if I had held my position instead of charging out after the tempting target of the isolated Southern Regiment, I could have stood a better chance.
The FaceTime hook-up worked great, and other than not being able to move the troops myself, was just like playing a face to face game with an opponent. I look forward to a chance for a rematch!


No comments:
Post a Comment