This past weekend I once again set up a fun little solo battle with the upcoming "Wars of Ozz" rules, written by Buck Surdu, and soon to be published by Old Glory/Blue Moon. (See
Ozz Battle Report for last month's game.) I thought folks might again appreciate seeing a play-by-play to get a feel for how the game flows. All the figures used in the game are from the upcoming official "Wars of Ozz" figure range, except Evora the Witch, the Brigade Commander for each side, and two bases of skeletons. These were all proxy figures.
Please note, the rules, point values, modifiers etc., are still being tinkered with, so all of those that you see mentioned here might not be exactly what's used in the final version. The general mechanics of game play should however remain the same.
The rules can be played one on one, or with teams of multiple players on each side. In general, each player commands a Brigade consisting of 25 points worth of troops. Brigades are usually comprised of troops from one of the four main factions: Munckins, Winkies, Gillikins, or Quadlings, and these can be supplemented with an assortment of allied troop types.
For my battle, I created a Munchkin Brigade and a Winkie Brigade, and tried to make them a little different than the ones I used in the last game. Here's the order of battle:
Munchkin Brigade
1) Brigade Commander, generic 0 point
2) Zoraster the Wizard 3 points
3) Col Sourdough's Regiment 6 points
4) Col Hardsole's Regiment 6 points
5) National Guard Regiment 5 points
6) Light Cavalry 5 points
Total: 25 points
Winkie Brigade
1) Brigade Commander, generic 0 points
2) Evora the Witch 3 points
3) Winkie Regiment 4 points
4) Winkie Regiment 4 points
5) Greater Pumpkin Heads 5 points
6) Skeletons 5 points
7) Light Artillery 4 points (Note: I used a Quadling model for this, as I didn't have a Winkie one, but I used the Winkie stats for it.)
Total: 25 points
For this game I decided to use the scenario creation system from the rulebook. This system lets you randomly roll for a scenario type, i.e. Raid, Ambush, Attack/Defend, etc., but given I have a limited selection of figures to choose from, I picked the simple Meeting Engagement to do, as that best suited my collection.
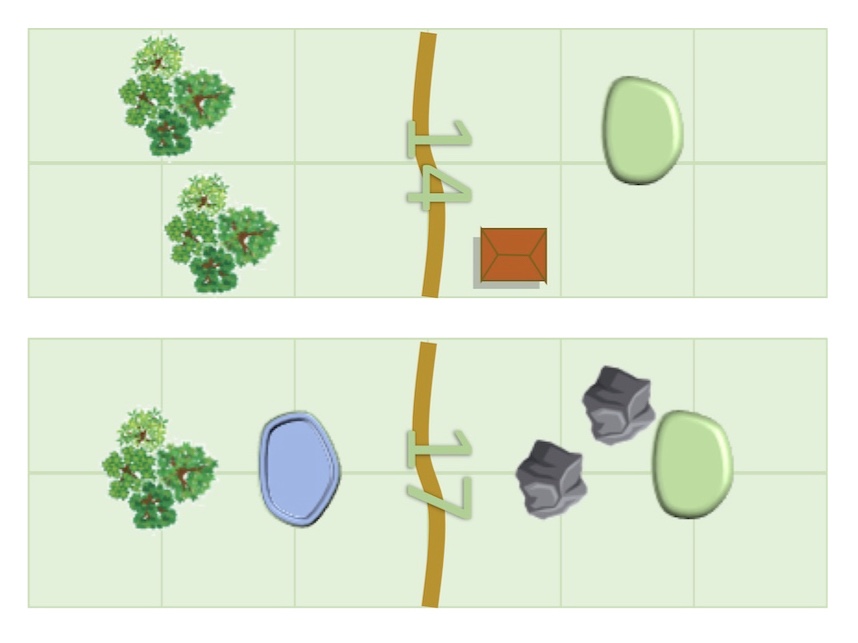
My next step was to randomly roll for a map for each side. The rulebook provides 20 different half-maps to choose from. For my game, I rolled map 14 for the Munchkins and map 17 for the Winkies. Once generated these two maps would combine to form the tabletop layout, but first each side got to pick which edge they want to enter from. As the Munchkin player I decided to put the edge with the built-up area and woods closest to the center as I figured these would give me nice bases to fire from. As the Winkie player, my map was relatively symmetric, but I decided to orient it so the rocky outcroppings were closest to the center, as I figured these would help cover my approach and make it harder for the Munchkins to get line of sight to my units.
These chosen orientations gave us a map looking like this. With the Munchkins entering from the top, and the Winkies entering from the bottom.
 |
| Each map half is laid out in a 2'x6' grid, giving a final 4'x6' tbale layout. |
I put the leaves in my dining room table and was able to provide a 3.5'x5' surface to set up on, close to the recommended 4'x6'. With a little adjustment I squeezed the map scenery to fit the available area, and set up as close an approximation to the map as I could with my terrain collection.
Then, since I was playing solo, and this was just a meeting engagement, I decided to try rolling randomly for deployment for each side. For each unit I rolled a d6, and the resulting number would be its order in the battle line working lowest to highest, and left to right. Any units that rolled the same number would enter stacked one behind the other, up to two units; if a third unit rolled the same number it would reroll, so there would be no 3-unit stacks. Brigade Commanders could set up where ever provided the best position for them given command radius restrictions.
For the Munchkins the deployment rolls were as such:
[4] Zoraster the Wizard
[3] Col Sourdough's Regiment
[1] Col Hardsole's Regiment
[5] National Guard Regiment
[3] Light Cavalry
This gave the Munchkins a line of deployment with the Hardsole Regiment [1] on the far left, then the Light Cavalry [3] with the Sourdough Regiment [3] stacked behind it, then Zoraster [4], and finally the National Guard [5] on the far right.
For the Winkies the deployment rolls were as such:
[3] Evora the Witch
[1] Winkie Regiment
[1] Winkie Regiment
[5] Greater Pumpkin Heads
[5] Skeletons
[6] Light Artillery
This gave the Winkies a line of deployment with the two Winkie Regiments [1]&[1] stacked on the left, then Evora [3], then the Great Pumpkin Heads [5] and Skeletons [5] stacked, and the Artillery [6] on the far right.
Given these set deployment sequences, I then had the flexibility to set the specific units up, in their specific order, anywhere along their entry edge, up to 6" in.
(Click on any photo to view larger)
 |
| Opening deployment |
One of the fun things about War of Ozz is the leader characteristics table. Each 0-point Brigade and Regimental commander you have rolls on an attribute table before the game. This table assigns them a name, sobriquet, and a quality. This quality might bestow benefits or detriments to their units.
So, for my Munchkins, my Brigade Commander got the quality "Superior Drive", which gave any unit he attached to a +2 Move. The Regimental Commander of Col Sourdough's Regiment rolled "Hesitant" which gave the unit -1 Elan, Col Hardsole's Regiment rolled "Stealthy" which gave the unit the ability to make anyone that shot at them re-roll one musketry die, and the National Guard Regimental Commander got "Zealous", which made the unit charge anyone within 10" that shot at them. The Light Cavalry Commander got "Impatient" which allowed the unit to attack first in Melee. Allies and Batteries don't have such identified commanders.
My Winkies' Brigade Commander got "Superior Fighting Skill" which gave a +2 Melee to any unit he attached himself to. The commander of the 1st Winkie Regiment got "Indecisive" which added or subtracted 1 from its move depending on if its Movement roll was odd or even, and the other Regimental Commander got "Poltroon" which gave the unit a -1 Resolve. Neither the Skeletons or Great Pumpkin Heads have regimental commanders.
Zoraster had these pre-assigned Spells: Uncanny Marksmanship, Rally, Heal, Good Luck, and Poor Luck. Evora the Witch had the following pre-assigned Spells: Fire Ball, Blood Lust, Poppies, and Fear.
Briefly, activation is handled in the following way: each Brigade Commander has a pool of d6 dice, one for each unit in his command. At the beginning of the turn these are rolled and placed by the leader in a dice pool for each unit within his command radius. Each unit that is out of command radius rolls its d6 individually and places it by the unit's leader. A deck containing cards numbered 1-6 in red and 1-6 in black is then shuffled and placed on the table face down. Play begins with flipping cards one at a time. As the card numbers are revealed, if the commander has a die with that number, he can assign it to one of his units, and that unit can activate. In cases where both sides have units with the same number in close proximity, each side should be assigned a color (red or black) at the beginning of the game, and what ever color the card is is the side that goes first. (For my game I assigned Red to the Winkies and Black to the Munchkins.) Movement is a set amount, plus the amount of the highest of a 2d10 dice roll.
 |
| Turn 1, Part A |
TURN 1, Part A: [Note: For each turn, I took a photo at the start of the new turn (or the end of the previous turn depending on how you want to look at it), and then I took a shot at the halfway point after the first 6 cards were drawn.]
Both sides set up their units in columns to try and get an early movement advantage in order to secure key terrain. The game then began with both 5 cards coming up in succession, which gave the Winkies a big early advantage, as the Munchkins had no 5's in their command dice pool and the Winkies had two of them.
The Winkie 2nd Regiment quickly entered, then shook out into line once it had advanced past the nearby pond. The Great Pumpkin Heads also raced ahead, getting super movement rolls and actually getting a small toehold in the farm. The Munchkins then sprang into action with the Black 4 card; Hardsole's Regiment advanced and got right to the far opposite edge of the farm. The National Guard Regiment also rushed forward and began to make their way through the woods on to their front right.
Next, the Black 2 was drawn, and the Munchkin Cavalry was ordered to head to their left to harass the enemy's flank. Colonel Sourdough's Regiment entered the field and headed left behind the cavalry. Over on the Winkie side of the table, the artillery entered and trundled up the small hill to their front and unlimbered just at the crest.
A Black 3 was next, and the Winkie 1st Regiment entered and advanced in column. Then the Black 6 was flipped and Zoraster jogged after the National Guard Regiment to help support them; while across the table the unit of Skeletons entered the field and and followed in the path of the Pumpkins.
 |
| Turn 1, Part B |
TURN 1, Part B: A Red 1 card was drawn next, and Evora followed the artillery as the Winkie Brigade Commander moved forward and took cover in one of the large rocky outcroppings. Across the way, the Munchkin Brigade commander moved forward as well, to take up a position in the road near the farm. The next card was the Black 1, and Evora took up a position next to the artillery battery on the hill, while both Brigade Commanders held their position.
The Red 4 was now drawn. Colonel Hardsole's Regiment realized the race to occupy the farm was fruitless now, as they didn't want to get involved in a fight with the Great Pumpkin Heads where visibility and musket range was limited. So, the unit formed line and backed up; which would force the enemy to come out of the cover if they wished to close. Over on the far right of the Munchkin line, the National Guard slowly marched further into the woods and formed into line.
Next, the Red 3 was flipped, and the Winkie 1st Infantry advanced to a point directly behind the 2nd Regiment and then formed line. The Red 2 was drawn then, and the Winkie Artillery, with all targets out of range, and seeing the enemy cavalry (also a 2 activation die) just across the valley, held its position.
Over on the Munchkin side, the Munchkin Light Cavalry commander judged the distance to the enemy artillery battery across the valley, and knew if they were going have a chance to take it out, it was now or never. The first gamble would be if the unit could make it across the distance in one move. If they didn't, they would wind up in Disorder in close range of the guns. They were 20" away. Luckily, they rolled a 7, +3" for cavalry, +6" for column, and +6" for charging, a total of 22"; and into the valley rode the Munchkin Light Cavalry. Half a league, half a league, half a league onward! They approached the gun and the Winkie Artillery rolled its Resolve test to receive a charge. The result was "Stand and Deliver: Fire and Melee". The battery let loose with a close range shot, and 3 cavalry troopers were removed. The cavalry then needed to check their Elan to close with the enemy. They were already at a penalty for having lost a base, and having received close-range artillery fire (two shift down on the Elan table). Their Elan roll was only average, and combined with the shifts, the horsemen were forced to stop 4" from the target, became Disordered, and lost another base. (Note: I made the error in this game of counting only two hits on each cavalry base, one for each actual figure. Cavalry bases actually take 4 hits like an infantry base, each figure taking 2 hits.)
Back in the Munchkin lines, Colonel Sourdough's Regiment marched forward and formed line to the left of Hardsole's unit.
The last card of the first turn was the Red 6. The Winkie Skeletons advanced to the right of the Great Pumpkin Heads, while across the table Zoraster advanced into the woods with the National Guard Regiment.
 |
| Turn 2, Part A |
TURN 2, Part A: Because the Munchkin Light Cavalry was out of command radius, it had its command dice rolled separately from the dice pool, and got a 4. Lucky for them, Black 4 was the first card drawn, and quickly, without bothering to recover from Disorder, the troopers dashed towards the flank of the artillery to escape the cannon's arc of fire. They were just able to squeak outside the arc to safety.
Elsewhere in the Munchkin force, Sourdough's unit fired long range at the Skeletons but achieved no hits, and down the other end of the line the National Guard marched to the wood's edge and prepared to fire at the approaching Winkies. Over on the Winkie side, the Skeletons advanced a short distance and formed into line to the right of the farm.
Next, the Black 5 was drawn, and, seeing the Winkie Regiments approaching up the center, and knowing the Great Pumpkin Heads were just on the far side of the farm, Colonel Hardsole's regiment backed up again, and wheeled slightly to angle their firing arc to cover both the farm and the road. Their Brigade Commander repositioned behind them, while over in the woods, Zoraster cast the spell "Uncanny Marksmanship" on the Munchkin National Guard regiment, giving them a +2 to their Marksmanship attribute in their next activation.
A Red 1 was flipped next, and the Winkie Artillery nervously eyed the horsemen on their flank. Evora assured them she would handle them, and so the cannon took a long range shot at Colonel Sourdough's Regiment, missing, as Evora moved forward and clear of the battery to a position where she could get a clear view of the Munchkin Cavalry. Up next was a Black 2, and the Great Pumpkin Heads slowly made their way through the cramped confines of the farm.
The next card was a Black 6, and the two Winkie Regiments advanced. The 2nd, in the lead, veered to their left towards the National Guard in the woods, while the 1st Regiment advanced straight ahead down the left side of the road.
The Red 6 was flipped next, and the Winkie 2nd Regiment sounded the charge on their war-drums and the unit ran towards the National Guard Regiment in the wood-line. Quickly the National Guard tested their Resolve. They rolled poorly, panicked, and simply stood there in horror at the onrushing green horde without firing their muskets ("Stand, No Fire"). The Winkies cheered and rolled their Elan to close, getting an average result, but good enough ("Close and Melee"). (Melee was then fought in a series of rounds. Each round, both sides rolled to inflict casualties on the other side, then both sides tested their Elan to see if they would decide to stick it out and fight again, fall back, or, worst of all, Rout.)
 |
| The Winkie 2nd Regiment prepares to charge the Munchkin National Guard. |
The first round of combat, the Winkie's superior hand-to-hand skills shown over the under-trained National Guard, and the green-skinned attackers did 3 casualties to the diminutive defenders, while only taking 1 themselves. Both units then passed their Elan checks to stay in Combat, and another round was fought. Again the Winkie skill prevailed, and they did 2 hits to the Munchkins (knocking out a base +1) while taking no casualties in return. With the casualties mounting the National Guard now wavered, and when they checked Elan they got "Move 4" back and become Disordered". The Winkies however, had their dander up, and their Elan check result was "Charge Ahead". So on they rushed, falling into Disorder themselves, directly into the withdrawing Munchkins. Another round of Melee was fought in the dark tangle of the woods, this time the Winkies doing 4 hits to the Munchkins (another base lost), while taking only 1 more hit themselves. Again, from their Elan test, the Munchkins fell back 4" Disordered through the trees, and again the Winkie attackers got "Charge Ahead"; bounding over fallen logs and between tall trunks in pursuit of their quarry. Another round of Melee as spear and bayonet clashed, but the Winkies only managed 1 hit this time, while taking 1 themselves. The Munchkins had had enough and having reached the back edge of the woods, broke into the clear and Routed from their Elan test. The Winkies once again got "Charge Ahead", but still being entangled in the woods, they fell short of reaching their target. They just emerged from the back of the woods and paused to catch their breath.
While the 2nd Regiment had been kicking the Munchkins through the woods, the 1st Regiment had continued its advance and now stood at the edge of the farm, poised to face off against the Hardsole Regiment.
 |
| Turn 2, Part B |
TURN 2, Part B: The second half of the turn started with a Red 4 being drawn, and the Winkie Skeletons launched a charge at the Sourdough regiment. As the boney warriors closed in, the Sourdough regiment tested its Resolve. The unit rolled well, and got the "Give it to them!" result, meaning they got to fire at the incoming unit and roll two extra Marksmanship dice. With a blast of musketry, a whole base of skeletal troops collapsed into broken shards (4 hits). The Skeletons then tested their Elan to close, and despite the base lost, they rolled well and got "Close and Melee". In the ensuing Melee, the Munchkins inflicted only 1 hit , and the Skeletons did 2 in return. Both units tested their Elan, and both stayed in the fight. The next round the Munchkins did 3 hits (another base gone), and the Skeletons did 2 more. With the loss of 2 bases, the Skeletons had had enough, and when they tested Elan they ended up having to drop back 4" in Disorder. The Munchkin's Elan test resulted in them getting to occupy the enemy's now vacated position. Over by the rocky outcroppings, the Winkie Brigade Commander advanced to get closer to his units.
Elsewhere on the field, the Munchkin Light Cavalry formed up on the flank of the artillery; but they had taken too many casualties to risk trying to charge; so they instead prepared their carbines for short range fire. The Sourdough Regiment then quickly reformed itself, then wheeled its right flank back as it could see the Great Pumpkin Heads were nearing the edge of the farm. On the other end of the Munchkin line, the National Guard Regiment made a desperate roll to Rally. Miraculously, they rolled a "2", and even with a 2 column shift for the loss of two bases, they Rallied, but on the downside, they remained facing away from the enemy.
Next, a Black 1 was flipped and Evora sprang into action, launching a "Fireball" spell at the Cavalry. It only did 1 hit, but it was enough to trigger a Resolve test for the half-sized horsemen. Luckily for the Munchkin troopers, they rolled really well, and held their ground (Steady, men! No Fire). As Evora worked her magic, next to her, the artillerist, rotated the gun to face the cavalrymen.
A Red 5 was flipped then, and over on the Munchkin side Zoraster cast "Uncanny Marksmanship on the Hardsole Regiment. With their magical enhancement, the soldiers of the Hardsole Regiment then let loose a volley at the Winkie 1st Regiment to their front, and scored 4 hits (a whole base!). The Winkies tested their Resolve, and the result was "Advance towards nearest enemy". They rolled their movement dice, and it was enough to bring them into contact with the Hardsole Regiment. Their heart wasn't in it though, because when they rolled to close the Winkies were able to engage the enemy, but earned a -2 in Melee modifier. The Munchkins were apparently caught off guard by the sudden Winkie advance as they had a mediocre roll as well, standing but not issuing any incoming fire. The two units met in a clash of spearpoint and bayonet, and each side did 3 hits to the other. The Winkies recoiled from the stiff Munchkin defense, as their Elan roll had them falling back 4" in Disorder. The hearty Munchkins however, stood their ground and even advanced forward into the position the Winkies had just occupied.
 |
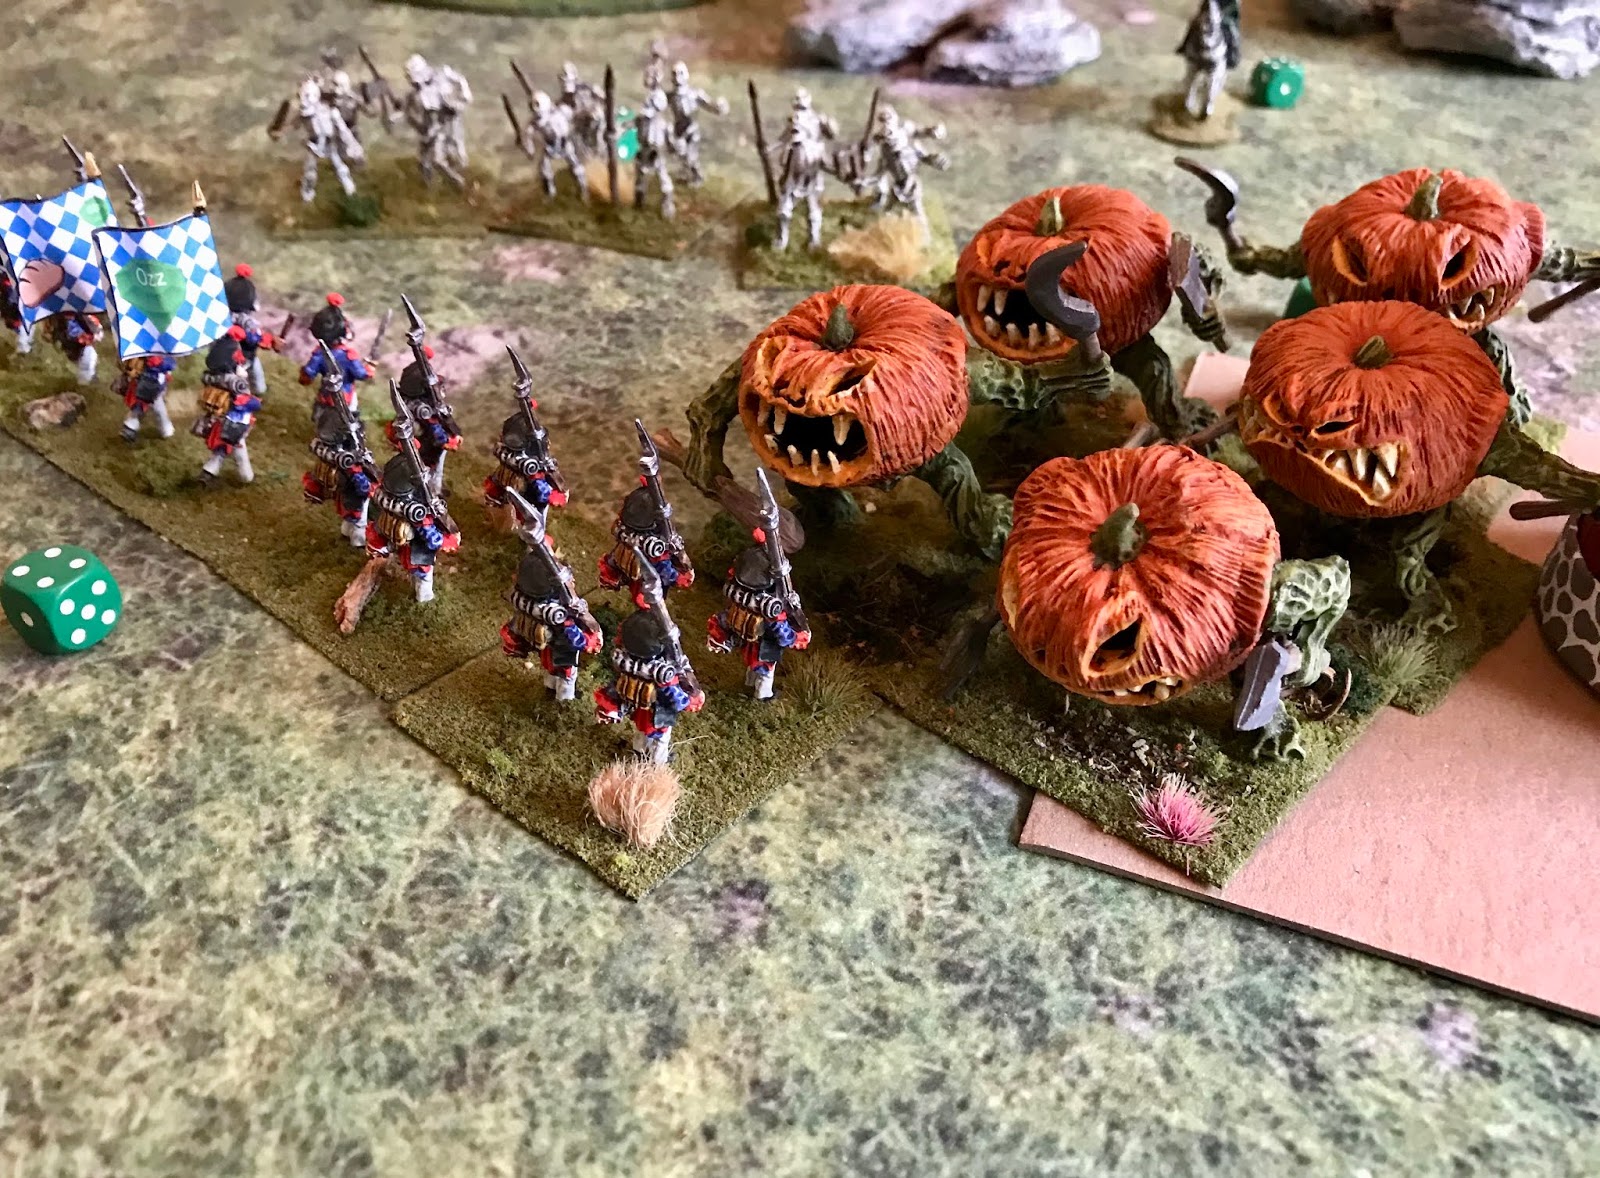
| The Great Pumpkin Heads charge from the farm, hitting the right end of Sourdough Regiment. |
The next card was the Red 3, but there were no "3" command dice in play, so I went on to the next card, the Red 2. The Great Pumpkin Heads were finally in a position to charge, and launched their attack at the right end of the Sourdough Regiment. Despite the size of the monstrosities bearing down on them, the Munchkins tested their Resolve and held firm; and were even able to issue a volley at their assailants, causing two hits. The Pumpkin warriors wavered a bit, and were able to close with their Elan test, but suffered a -2 Melee penalty. The Great Pumpkin Heads did 2 hits to the Munchkins, and took only 1 in return. The Munchkins did not do well in their subsequent Elan test against such fearsome creatures, falling back 4" in Disorder (Note: A quality of the Great Pumpkin Heads is that they instill a -1 Elan penalty on anyone they are in Melee with.) The Pumpkin Heads checked their Elan, and simply Charged ahead in pursuit of their diminutive foes. Clashing once again, the Pumpkins did 3 more hits to the Munchkins, but the Munchkins only managed to inflict 1 more hit on the gourds. Both sides were down a base now, and after testing Elan again they mutually each fell back 4" in Disorder.
The last card of the turn was the Black 3, and since there were no "3" command dice, the turn was over.
 |
| Turn 3 Part A |
TURN 3, Part A: Turn 3 got underway with a Black 4 being drawn. The Winkie Artillery was the first to activate, firing point blank at the Light Cavalry, and scoring 2 hits. That was it for the horse troopers, and checking their Resolve after receiving fire, the unit Routed, galloping a long way back across the table. Over by the farm, the Great Pumpkin Heads reformed from their Disorder and changed formation into a line.
Next, a Black 5 was flipped, and Col. Hardsole's Regiment, still in Disorder, quickly opened fire on the Winkies to their front, doing 2 more hits. The Winkie 1st Regiment tested their Resolve, but already being two bases down had its effect, and the Winkies turned and Routed.
A Red 3 was drawn next, and the Winkie Skeleton unit took the opportunity to reform from their Disorder. Over on the other side of the Winkie line, the 2nd Regiment also took the time to reform from their Disorder, but then launched a charge at the nearby Munchkin National Guard who were formed from their previous Rout, but still were facing away from their attackers. The Munchkins rolled well, but being attacked from the rear, combined with being two bases down, made their chance to stand slim, and they fell back 4" more in Disorder. This took them almost to the edge of the table. However, it did put them out of range of the Winkie charge. Having had to reform from Disorder before launching a charge had cost the Winkie 2nd Regiment had cost the unit half its move, so its charge distance was reduced, and it fell short of reaching the Munchkins once they fell back. The Winkies therefore stopped at the end of their charge distance and fell back into Disorder. Over on the other side of the Munchkin line, the Sourdough Regiment issued a volley of Disordered fire at the Pumpkins, doing 1 hit, and then reformed their line. The Great Pumpkin Heads tested their Resolve from being fired at and stood firm.
The Red 5 then came up, and the Col. Hardsole Regiment took the time to reform, and then wheeled its left flank back, denying it to the enemy Pumpkins, in case they decided to turned their way. Red 1 was the next card, and Evora moved up to the Skeleton regiment; while in the center the Winkie 1st Regiment made its Rally roll, succeeded, but remained facing away from the enemy. Another Red card, the 2, rounded out the first half of the turn, and the Munchkin National Guard, their backs almost to the table edge, took the opportunity to reform and turn to face their pursuers.
 |
| Turn 3, Part B |
TURN 3, Part B: The second half of the turn brought the Black 3 card into play. The Sourdough Regiment unleashed a volley at the giant gourds to their front, doing a single hit. The Great Pumpkin Heads tested their Resolve, and were not happy with the incessant Munchkin fire, falling back 4" in Disorder. Nearby, the Skeleton unit advanced to the nearby hill in and attempt to get on the flank of the Sourdough Regiment.
Over on the other end of the Munchkin line, The Winkie 2nd Regiment once more reformed and launched a charge at the National Guard. In a moment of fierceness and good dice rolling, the Munchkins stood, but were unable to issue any fire. The Winkies, perhaps unnerved by the Munckins' steadfastness, closed, but at a -2 Melee penalty. In the fight that ensued, the Munchkins did 1 more casualty to their Winkie attackers, and the Winkies handed out 3 more casualties in return. Both units then checked their Elan. It was no surprise when the Munchkins fell back 4" in Disorder; which now put their backs on the table edge. The Winkies, ready for the kill, got Charge Ahead for their Elan check. Both sides exhausted, the Munchkins couldn't manage to inflict even a single casualty, and the Winkies for their part only did 1. It was enough though, and in the subsequent Elan test, the Munchkin National Guard Routed, and exited off the table. The Winkies occupied their position in Disorder.
The Black 6 was flipped next. First thing, Zoraster cast "Uncanny Marksmanship" on the Hardsole Regiment again. The Munchkin Cavalry attempted to rally, failed and had the penalty of losing a base as they continued to head for the table edge. Up next was the Black 2, during which the Winkie Brigade Commander shifted left to bring the soon to be advancing artillery into his radius. A Red 6 followed, and the Light Cavalry attempted their final Rally roll, with the result being the last base was dissolved before even reaching the edge of the table. Zoraster attempted to cast another spell, this time "Bad Luck" on the nearby Winkie 2nd Regiment, but he failed his Spell roll this time.
The next card drawn was the Black 1 and Evora successfully cast "Blood Lust" on the nearby Skeleton unit. This spell ensured they would automatically pass their "to close" roll the next time they charged an enemy unit. Over by the road, the newly rallied Winkie 1st Regiment turned to face the enemy, and then started the march back to the battle. The last card of the turn was the Red 4, and with this the Winkie Artillery limbered up and began to advance closer to the fighting.
 |
| Turn 4, Part A |
TURN 4, Part A: The Munchkin situation had become desperate now, with the enemy closing in on all sides. The first card drawn for the turn was the Red 5, and the Winkie Skeleton Regiment wheeled and charged into the flank of the Sourdough Regiment, their success guaranteed by Evora's "Blood Lust" spell. Already battered, and now being attacked on the flank, the Munchkin Resolve test resulted in their Routing to near the table edge. The Skeletons continued their charge up to the maximum move, and then halted in Disorder.
The Black 4 was flipped next, and the Hardsole Regiment unleashed their volley under the influence of Zoraster's "Uncanny Marksmanship" spell. The feisty little warriors split their fire, shooting two bases at the Pumpkins at short range doing 2 hits, and three bases at long range at the Winkie 1st Regiment approaching down the road, doing only 1 hit. This volley caused the Giant Pumpkin Heads to fall back 4" in Disorder, while the advancing Winkie's remained steady. While the Munchkins fired at their foes, behind them the Winkie 2nd Regiment, that had chased the National Guard off the table edge, turned about-face and reordered itself.
Next, the Red 1 came up, and both Evora and the Artillery advanced closer to the Munchkin lines. After that, Zoraster cast "Rally" on the Sourdough regiment, and they halted their Rout and turned around to face the enemy.
A Red 4 was drawn next, and the Winkie 2nd Regiment charged the Hardsole Regiment, hitting the right side of their line in the rear. A poor Resolve roll on the Munchkins' part, combined with being hit in the rear, and the wee warriors fell back 4" in Disorder. The Winkies seemed to lose their nerve as well, and closed with the enemy, but at a -2 Melee modifier. Nonetheless, he Winkies inflicted 4 hits with their initial charge, where as the Munchkins only handed out 2 hits. Both units tested, and the Hardsole Regiment fell back another 4" in Disorder, while the WInkies simply charged ahead in Disorder after them. The next round of fighting and the Munchkins couldn't manage even a single hit on the enemy, while the Winkies gave their opponents 2 more casualties. The Munchkins suddenly found their nerve with the following Elan roll, and got "Stand and Fight", and the Winkies for their part were happy to oblige, dishing out 3 more hits, while taking only 1 in return. At that point, the Munchkins had reached their breaking point, and their Elan check had them Routing back down the road away from the enemy. The Winkies charged halfheartedly after them, but couldn't catch them, and halted Disordered in the road just past the farm. The Hardsole Regiment then tried to Rally on their activation, and failed; Routing again and losing a base to entropy.
Next up was a Red 2, and the Sourdough Regiment took a Disordered long range shot at the Great Pumpkin Heads, and then reformed their line. The Pumpkins remained steady from the fire. A Black 5 was then drawn and both the Pumpkins and Skeletons Advanced closer to the Sourdough Regiment.
That was the final card of the first half of the turn, and I decided to end the game there. The Munchkin force was all but shattered and there was little point in going on.
 |
| Final postions. |
The victory condition of the scenario was to eliminate the most enemy bases, and the final count for this game was 14 eliminated by the Winkies, and 10 eliminated by the Munchkins; so the Winkies were the official victors.
It was a really fun solo game, and I thought it could have gone either way right up until the last turn. A couple better dice rolls and card sequences for the Munchkins and I believe they could have clawed out a victory. They're very good Marksmen, and when they got volleys off they were often slicing away whole enemy stands at a time. The trouble was that they actually got to fire very few times, due to the terrain, and the Winkies often getting the good card draw sequences.
Reviewing the game, I will also admit to making some arguable mistakes as the Munchkin commander. The Light Cavalry charge was probably doomed from the start outside of very lucky dice rolling; but in my defense it did occupy the cannon for half the battle, keeping it from getting close to the front lines and shelling the infantry. My other questionable move was using the Hardsole Regiment to split fire at the Winkie 1st Regiment and the Pumpkins in the beginning of the 4th turn, rather than use the opportunity to wheel the line and attempt to deny the Winkie 2nd Regiment the chance to charge the unit's rear or flank. In my defense, it would have required a backwards wheel of the unit's right to bring that part of the line behind the Winkie's, and moving backwards would have been at half speed; so the likelihood of my rolling enough movement to accomplish this would have been impossible. And this doesn't even take into account that such a wheel would have also pointed the unit's left flank directly at the Great Pumpkin Heads. So it was a rather rock and hard place situation.
I hope you all enjoyed this report, and it helps gives you a sense of the mechanics of the game . If you have any questions about the rules or figures, please feel free to ask.
For more information, visit our website:
Wars of Ozz.com and/or our Facebook page:
Wars of Ozz on FB