Monday, January 25, 2016

Making Frostgrave's Harbor: Part III (Final)

  This past weekend, during the big East Coast Blizzard, I worked on building the actual dockside for the city of Frostgrave.  I used pink foam insulation sheeting for the core of the wharf, and the cork tiles,I've been using for my Frostgrave buildings to do the facings.  For the top surface I used some cobblestone roads I got at Walmart over the holidays in their Christmas village section.
   (You can click on any photo to see it larger)


     I made three 1' sections, and a fourth small ramp piece.  After everything was assembled, I primed it all black.  After that, I drybrushed all the stonework with three levels of gray, and the wood with browns, and then applied snow and icicles.
     I'm very happy with how everything has come together.  I think this will be a fun addition to my Frostgrave games.  I can't wait to have a chance to try this setting out.


When I wasn't building terrain, I was outside Frostgrave "LARP-ing" :-)

Part I 
Part II

Tuesday, January 19, 2016

Dwarven Forge's City Builder Terrain System Kickstarter Arrived!

   Just a quick blog update to let folks know that I was surprised to find my fulfillment package from Dwarven Forge's City Builder Terrain System Kickstarter waiting for me on the doorstep this afternoon.    It was last March when I bought into this Kickstarter.  I didn't receive any shipping notice, so it came as quite a pleasant surprise.


    It's going to take a while to unpack all the little pieces, with each one being individually bagged.  But, I unpacked enough to play around with some simple builds.  I'm really pleased with how snuggly everything fits together, as I know there was some concern folks had abut this during the Kickstarter.

Here's a simple tutor structure, with a free DF figure and giant rat that came with my package.

One of the cool features, is the metal sheets in the roof pieces that allow magnetic accessories to be applied, like this fire.  There are also fire inserts that go in the window.

After the fire...  Here are some of the ruined pieces. I've noticed some pieces, like this ruined roof, are warped.  I'm going to need to see how to un-warp these.  Perhaps the same treatment as Reaper's Bones figures.
More to follow in the coming days, as I have a chance to play around with everything.

Making Frostgrave's Harbor: Part II

   This past weekend I was able to finish working on the ships for my Frostgrave waterfront.  I began by base-coating the ships dark brown, and then dry-brushed them with successively lighter coats of a grey-brown mix of paint.  (For part one of this article, see: Making Frostgrave's Harbor: Part I
The small ships with their paint jobs, before I "winterized" them.

The large ship all painted up in it's weathered look before permanently gluing it to its base, and before getting its winter treatment.
     I then applied snow paint and flocking to the bases, and a little to the ships themselves.  I also added a few Water Effects icicles to the ships.
The finished large ship, with the Templar aboard checking out.

A close up of the detail.

The Templar checking out two smaller vessels in the frozen harbor.

Detail shot of one of the smaller ships.
        I'm really pleased with how the ships came out.

     Since the city of Frostgrave is thawing out, I thought it might be fun to add some spots in the harbor where the ice had melted through, and the water was actually visible.  I figured it would be fun to have these areas where folks could push their enemies into the freezing water, or perhaps evil things could emerge.
     While at the local hardware store a couple weeks ago, I picked up a sheet of fluorescent light covering that had a cool crystalline pattern to it.  I wasn't sure what I was going to do with it at the time, but I thought it might work perfectly for this project.  I actually ended up using it to make the water portion, instead of ice, because when you painted the underside, the texture made it look like rippling water.  I began by cutting out a roughly oval section of the sheet.
Painting a "hole" on the underside of the plastic sheet.

I wasn't sure how I was going to do the surrounding snow, so at this point I masked the "hole" and sprayed the sheet white.

In the end, I decided to use some white felt to represent the snow, as that was what I was going to use for the harbor anyway.  I applied a small ring of Water Effects around the hole to represent the edge of the ice, and then I glued the felt over the plastic sheet to be the snow.
   Next up, I will be building the ruined dock along the city's edge, so stay tuned for Part III.

Friday, January 15, 2016

Making Frostgrave's Harbor, Part I

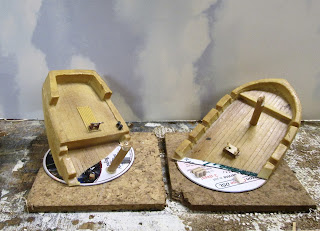
   Last year at a  wargame convention flea market, I was lucky to find some ships which inspired me to want to construct a waterfront area for my Frostgrave games.  The first of these was a model of a ship under construction.  The second was a lot of old pirate ships.
Wooden model of a ship being built. There was one figure on the model that indicated it was scaled for between 15mm and  20mm sized figures. With enough of the scale specific stuff stripped away, I thought it would do fine service for 28mm figures.
 
Simplistic pirate ships.  I'm not sure what they're made of; it looks a lot like the kind of foam insulation you squirt from a can.  I decided to keep the painted ones for they're intended purpose, but the unfinished ones were destined for the Frostgrave docks.

 The wooden model was very old apparently, as many of the glue points had dried out, and there were a lot of bits that had fallen off it.  This didn't bother me, as I already had thoughts of making it look like the ship in the beginning of the first National Treasure movie

A close-up of the "Charlotte" from the movie, National Treasure

And a wider screen-grab of the ship.
     Luckily, I had a friend with a bandsaw who was able to make the wooden ship into a waterline model.  He also was able to cut one of the foam ships in half to give me the ability to use it for two different half-sunk ships.  He also was kind enough to cut out a base for the waterline model to sit on.


     At this point, I've got the all the hulls ready to paint.  I added broken mast stumps to all of them, and used some of the extra bits from the big ship to add a bit of detail to the decks of the smaller ones.  I also made a couple crates to put in the ice around the smaller ships.
    I decided, since the base of the large ship would be snow, to paint the base white separately, and then spray the ship.  I'm not sure if I'm going to go with black or a dark brown.  Likewise, I'm not sure how the foam the pirate ships are made of will react to spray paint, so I think I will give them a coat of paint by hand, and then spray over that.


      Hopefully, I will get a chance to do some spraying later today.


Here is Part II
Here is Part III

Wednesday, January 13, 2016

A Pair of Quick and Easy "Dollar Tree" Frostgrave Statues

  This week I made a pair of quick and easy statues for my Frostgrave terrain collection.  They both were based off of figures I found in my local Dollar Tree store.  The first is a motion sensor rat that they had for sale at Halloween (It squeaks whenever anything moves near it); the second is a figure of Elsa from the movie Frozen, which is a toy that they seem to sell all year round.  I glued both to small Tropicana orange juice bottle lids using E6000 glue.
     I first sprayed them with cheap Walmart flat black spray paint.  This reacted poorly to whatever plastic the Elsa figure's dress was made from, as it dried tacky.  I painted over it with my regular black craft acrylic, and this seems to have solved the problem for now.  Next,  I drybrushed both of the figures with a secession of three successively lighter grey acrylic paints to give the statues a stone look.
    I must say the whole time I was painting the rat, it's motion sensor "squeak" was going off repeatedly; and more than once I was tempted to throw the whole thing against the wall as it was driving me crazy.   I'm now praying the cheap battery inside dies quickly.  I had thought it might be cool if the statue occasionally made the squeak sound during a game, but this thing goes off almost constantly!
   I let the paint dry for a day, and then sprayed both with Testor's Dullcote varnish.  The next day I applied some snow effects and a couple icicles to Elsa.  I think I'll leave the Rat plain, so he can be used in other non-Frostgrave games.


Wednesday, January 6, 2016

28mm Sci-Fi Tanks from Made-in-China Toys Conversion

  Right before Christmas I made a pair of Sci-Fi tanks as a present for a friend.  I had seen other folks online who had modified inexpensive toy tanks into Sci-Fi tanks before, and it seemed like a fun project to do.  I was happy to have a reason to make a pair of them myself.   I started by buying a bag of toy soldiers that contained two plastic tanks from the toy aisle at the local Walgreens.
    I replaced the existing turrets with ones made from old Spiriva inhalers, and the gun barrels were made from syringe covers.  I also added some engine pods to the backs of both tanks made from dollar store toy binoculars separated into two halves.  Other model and toy bits were then added to round out the look.
 I glued a large fender washer into the hole where the old turret sat, and a section of copper tubing to the underside of each turret, allowing them to rotate when in place on the hull.  When everything was assembled, and the glue had had time to dry, I sprayed the tanks with light green camo spray paint.
      When the spray was dry, I added details, weathering and decals to complete the vehicles.
    I'm pleased with how the pair turned out, and am looking forward to seeing them used in a game.

Tuesday, January 5, 2016

HAWKs New Year's Eve Gaming Party

As has become the tradition, every NewYear's Eve, HAWKs member Buck Surdu and his family host a gaming party for the club.  This year we got to play two fun miniatures games, and a couple boxed tabletop games before the clock struck midnight.
     The first game, run by Buck, was a large 14-player Pulp free-for-all using GASLIGHT rules.  It involved Nazis, Arabs, Cultists, US and other Allied Soldiers, Duke Morrison and his gang, as well as Indiana Jones and his buddies, The Sergeants Three, Lara Croft, and a host of others!  Everyone had their own objectives they needed to accomplish in order to score points. Highest points won.
An overview of the table for the Pulp GASLIGHT game.
      A Nazi archeologist had uncovered some artifacts at a pyramid on one corner of the table, and the group of French I was commanding along with a team of Main Characters, called The Wild Bunch, had similar objectives of killing Arabs, and stealing the artifacts near the pyramid. The French also had the task of destroying the Platypus statue that stood near the pyramid.
Carnage ensues in one of the towns as several factions fight for control of a truck.
   I started at the far end of the table unfortunately, so had to hike a considerable distance.  Luckily, a another player drove a truck nearby my French unit, and they were able to waylay it and commandeer it from its lone Arab driver and Boats Morgan who was standing on the running board trying to fight the driver himself.  However, no sooner had I stolen the truck, then a second one approached and I got greedy.  I thought I remembered that this truck only had a lone Arab driving it as well, so I only sent half my French unit to grab the second truck while the rest of the unit mounted on the first truck. To my surprise however, the second truck was bristling with angry gun-toting Arabs, who made quick work of the approaching Frenchman.  At that point the rest of the unit in the first truck, sped off towards their objective, while the going was good.
US Soldiers attempt to drive off the Nazi She-Wolves from the archeological site; as a mummy, awoken from his tomb, rampages.
     My other unit, the Wild Bunch, continued to hoof it on foot, and approached a ridge where a unit of Arabs had taken up position and were taking long range potshots at the Nazi She-Wolves guarding the artifacts at the pyramid.  I was hoping I could get up behind them and open fire before they turned around, but they got the initiative snd turned and charged at my unit.  A multi-turn melee then took placed, where the Wild Bunch and the Arab unit ground each other down until only one member of the Wild Bunch was left and a couple surviving Arabs had fled off the ridge.
     At this point the game was winding down, and my French had driven their truck straight trough the archeological site, crushing one of the artifacts and a couple of the Nazi guards as well. They pulled up the truck just next to the Platypus statue and jumped out and ran to the statue. The final activation deck of the game was begun, and when the French card was called I pushed the plunger on my dynamite charge, and blew the statue and the remains of the unit as well.  Only the French Captain survived, being blown clear of the blast; and the Platypus statue was destroyed.
    The game was a blast, and everyone had a great time! I ended up coming in second place with 20 points for destroying the statue.
My French Captain looks on at the wreckage as the Platypus statue, and his command, at the game's end.
      After a dinner break, we reconvened to play the traditional Santa-themed game.  This was run by Kurt Schlegel, and used the same desert terrain the first game did.  In this scenario Santa and his forces had traveled to the desert island lair of the Goblins to rescue some prisoners that the Goblins had kidnapped during their last raid on the North Pole.  I was given command of a unit of Teddy Bears, their cannon, and Hermie the elf (of dental aspiration fame!)  I was part of the main force tasked with clearing one of the two towns and searching for prisoners.
GM Kurt Schlegel, instructs a player at the start of the Santa Claus game.
     My forces were slowly ground down by Goblin archery fire from the town as I approached, and my cannon crew was eaten by the Goblins' dragon.  As I reached the outskirts, the Goblins charged forth and a big melee ensued.
Santa, his trusty sidekick Polar Bear, a clockwork nutcracker, Giant Minion toy, and the North Pole Elf Militia enter from one end of the town.
     After a couple turns of melee, the remaining Goblins fled, but my command had been badly mauled.  Luckily my co-commanders had done better, destroying or routing most of the Goblin army, so the Santa force was declared the winners.
My Teddy Bear forces prepare to assault the other end of town, as the Goblins line up on the outskirts and prepare to meet us.
     Afterwards we played a fun game of Red Dragon Inn, and the Star Trek game Five Year Mission, until midnight, when we toasted the New Year.   It was a great evening shared with friends and a great way to usher in 2016!
Red Dragon Inn!