Wednesday, December 2, 2015

Frostgrave: Building an Illuminated Well of Dreams and Sorrows

   I recently constructed an illuminated fountain to use in the Frostgrave "Well of Dreams and Sorrows" scenario, and I thought I would share a step-by-step process of how it was assembled.
     It all began during a trip to the local Dollar Tree store, where I found this nifty battery operated LED light set and these crystal snowflakes.  They gave me an idea for some sort of courtyard with glowing crystals growing in it.
     I then picked up this large wizard figure in a trade, thinking I would use it as a statue; but then I started to think about the possibility of having water shoot from his hands and turn it in to a fountain of some sort.
   It didn't take long for those two ideas: the crystal courtyard, and the wizard fountain, to come together as a single plan in my mind.
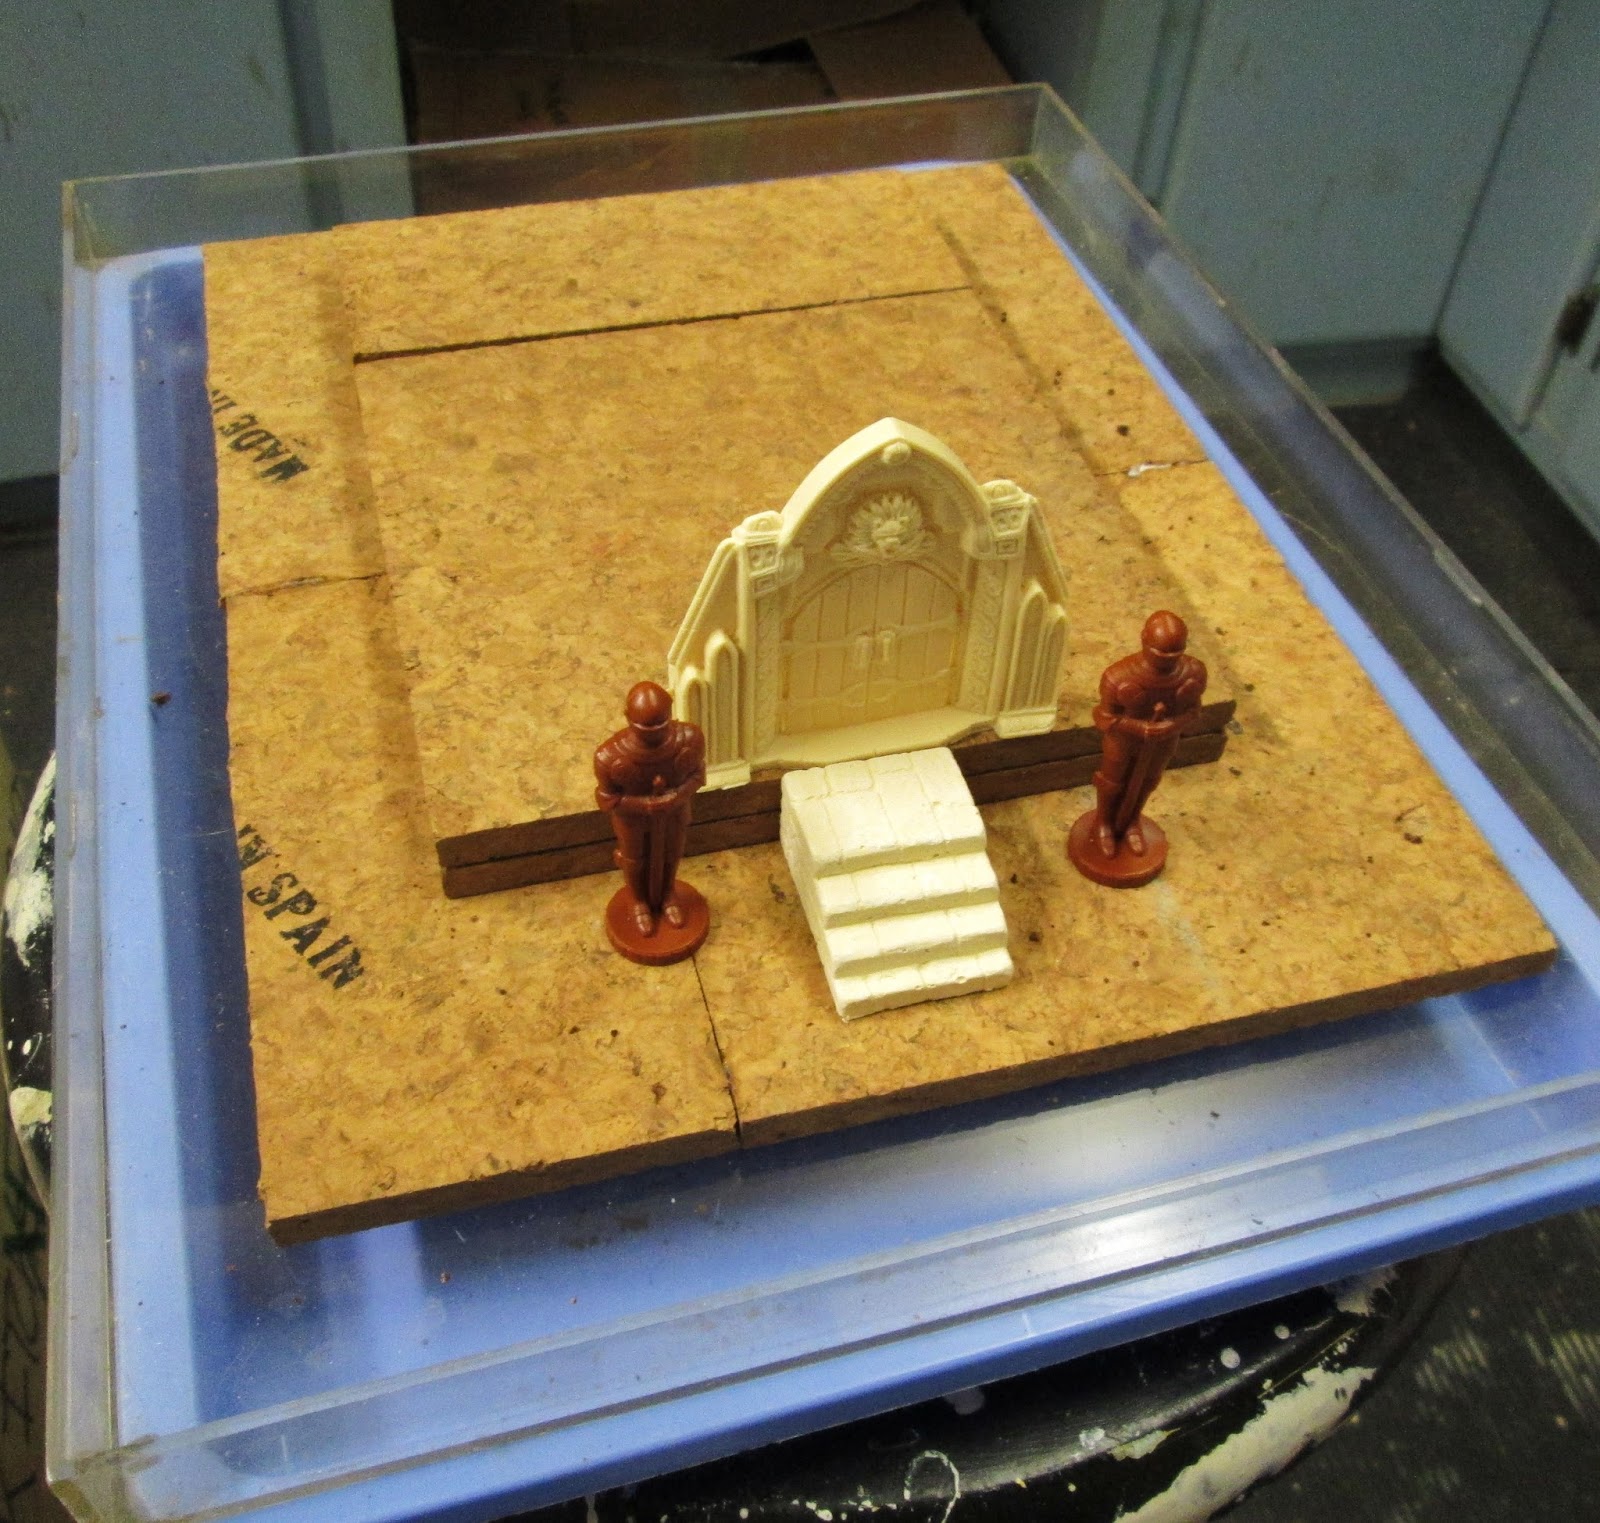
   I began construction by making a cork base out of two 6"x 6" cork tiles. I then glued tin foil on it to help with the reflection of the LED lights.  I then added cork walls on the sides and made a divider for where the battery pack would sit.  Next, I added cork risers to support the floor of the fountain's courtyard.
      I made the courtyard out of foamcore, and scribed paving stones on it.   I also cut out the well for the fountain from a roll of thin cork sheeting I had, and glued that in place.  I had earlier glued the wizard to a plaster disc, and sprayed the combined pieces with gray primer.
    I made a deck for the fountain, to cover the battery pack, and scribed that as well.  I then punched holes in the courtyard for where I was going to put the crystals, then glued the courtyard and fountain deck into place.  I then cut a semi-circular piece out of a translucent surface cutting protector I had, to make an under-surface for the fountain's basin.
   I made a fake cork wall to fit in the back of the battery compartment, to finish this part of the build.
    I then worked on the turning the wizard into a fountain.  First, I drilled a small hole in each of his hands then ran thin clear filament through them, (I don't know if its specifically fishing line, as it is what came with a string of beads on it that my wife bought at the craft store for jewelry making. But it looked close enough to fishing line for my purposes!), and glued them to the hands with super glue. I then looped the lower end of the upper filament around the lower filament and spread superglue over the joint.
     At this time I also made sure all the seams around the courtyard were well sealed with glue, so no light would leak out.  I spread a sand and grit mixture around the edges as well, to help seal them up.
     When the superglue dried, I clipped the filaments where they came out of the the back sides of the hands so they were flush and would be hidden when I painted the wizard, which I did next.  I then put this aside  and worked on painting the fountain and courtyard.  I painted the courtyard black first to help contain the light; then everything was painted dark gray and then drybrushed with lighter grays.
     When the fountain and courtyard paint were dry, I glued the wizard in place and glued the loose end of the filament to the translucent surface of the fountain.   When these was dry, I spread Woodland Scenics Water Effects on the filament  to make it look like streams of water, and put a layer of Water Effects in the fountain basin.  
     I also cut up sections of the crystal snowflake and made some small crystal outcroppings to stick in the courtyard.  I was very happy to discover that the clear snowflake plastic worked well with my Plastruct plastic cement.   I then used some of the Water Effects to glue these crystal outcroppings into the holes I had made earlier in the courtyard.
     The final step was to apply "Snow" and some icicles here and there around the piece to help it blend with my other Frostgrave terrain.
Shown with Reaper's Anirion, Wood Ef Wizard, for scale.
      Here's a look at the finished fountain illuminated with the room lights turned off:
   And here, with the lights in the room on, you can still see a bit of the illumination:
    Here's a look at the hidden battery compartment door:
     I'm really please with how this turned out. It's very much as I had envisioned it to be at the start.  I can't wait to get to use it in a game.
     In case anyone wants to do something similar, here are a few things I'd do differently if I was to do this again:  First, I'd pay more attention to making sure the LED lights matched up with where the crystal holes would be;  I just kind of jammed the lights in and hoped for the best.  I would also line the underside of the courtyard deck with foil as well, to help get more light reflection underneath.  Lastly, I would paint the inside of the fountain before I sealed it up with the translucent under-surface I glued on.  It doesn't look bad, but I wish I had panted it the same gray that I painted everything else, or perhaps black.  As it was, I didn't think to do this until too late.

Saturday, November 21, 2015

HAWKs Run Memorial "The Sword and The Flame Game"

    Friday night, and their regular meeting, the HAWKs played a memorial "The Sword and the Flame" game to commemorate the passing earlier this month of the rules' author, Larry Brom.   Many of the club members had not played the rules in over a decade, and for some of the younger members, this was their first exposure to the rules.
      GMs Buck Surdu and Chris Palmer chose to use the "Revision 1" version of the rules.  The scenario involved a British column sent to capture a Pathan fort where "Wee Willie Winkie" was being held.
     The game seemed to be a close one until the unit defending the fort failed their Critical Morale at 50% casualties, and decided to "abandon ship".   After that, things fell apart pretty quickly for the Pathans.
      Everybody had a great time, and for this old wargamer it was a lot of fun to dust off this old set and run it again.  Many of my formative wargaming years were spent playing these rules, and this was a nice trip down memory lane.
          Hopefully another decade wont pass again before we break out these timeless rules for another game.

Tuesday, November 17, 2015

HAWKs Help GM an Army SLPD

 This past Monday, a group of Gamemasters from the HAWKs (Harford Area Weekly Kriegspielers) took part in an Army Senior Leader Professional Development session by running three historical wargames involving the northern, central, and southern wings of the Battle of Antietam.
Buck Surdu, in blue "HAWKs" shirt, briefs players on the rules before the beginning of the game.
    This event, organized by Sam Fuson,  was actually the culmination of of a three part exercise. Particpants had previously done a Staff Ride of the battlefield, and the senior commanders had done a map exercise to determine the actual location and arrival time for the corps involved in the battle. Some of the goals of the event were team building, leadership training, decision making, and reinforcing the principles of battle.
An overview of the room at te height of the action.
    The participants: more than 30 Army officers, NCOs and senior civilian staff, where divided up and each assigned to a table, with a senior officer or civilian taking the command of  each side in the battle, and others acting as their sub-commanders.   Four objective locations were marked on each of the tables with small flags,  The objectives started in control of the defenders, and it was the attackers' job to try and capture them.
Sam Fuson, in hat, supervises players on conducting a melee.
     The rules used for the games were, "A Union So Tested" ACW divsional level rules.   The figures used were  20mm on two of the tbales and 10mm on the third.  Game-masters for the event were myself and Sam on Table 1, which was the north end of the battlefield including the The Cornfield, Buck Surdu and Dave Wood did the center of the battlefield and the fight around the Sunken Road, and Eric Schlegel was the GM for the Southern portion of the battlefield, including the Burnside Bridge area.
Dave Wood, in blue shirt, helps a player measure an artillery battery's range
     For many of the participants this was their first exposure to historical miniatures wargaming, yet most were able to quickly pick up the concepts and rules, and after a few turns were fully engrossed in the games and the command of their units.  There was lots of friendly trash-talk among the participants, as well as table-wide cheers and groans as fortunes rose and fell.
Eric Schlegel in blue shirt, advises players on their options during the game
     Everyone seemed to have a good time, including us, the gamemasters.  This is an event that I have taken part in now for 6 years, and the eighth such event, and it is always a blast.  Thanks to Sam's efforts it is always well run.
Buck Surdu, conducts an informative AAR session on Table 2.
     At 1430 hours, Buck called the time for the games to end.  The participants gathered at each of the tables and  Buck led an after-action discussions on the outcomes for each of the games.  Commanders were questioned about their mission goals and how well their objectives were met; obstacles that arose and insights that were gained.


Saturday, November 14, 2015

Another Frostgrave Cork Ruin Completed.

   I recently completed another ruin for my Frostgrave set-up, using cork tiles.  This one I designed to be a more substantially built building, so less "ruined" than the previous ones.  I used a spare Armorcast doorway I had for the main door, an old set of plaster steps for the front stairway, and a pair of game pieces from the old boardgame "All the Kings Men" for the statuary.
Test fitting the components

The walls cut out, and being glued.

The main structure painted, and now the roof and debris being added.

The finished product.

Another shot of the finished product.

Monday, November 9, 2015

Fall-In Report: Happy Birthday General Grant by GASLIGHT game

  Friday night at Fall-In I ran my "Happy Birthday General Grant by GASLIGHT" game, using 25mm figures and GASLIGHT rules.   I had only run this game once before for a friend's birthday gaming day, so was a little unsure going in to it how it would turn out.  I shouldn't have worried...
Union Dignitaries, and proud Army Cooks, pose with the huge cake prior to the Confederates crashing the party.
      The set-up for the game is this:  Union Army Cooks have made a huge birthday cake to celebrate General Grant's birthday, and have shipped it via railroad car to a small town near the front, where a small celebration is being held; with troops on parade, along with the latest steam-powered technology, and assorted honored dignitaries.
The surprise is sprung: Rebel Mole Machines burrow up from the earth, with the Whiskey Wagon right in front of them.
      The Confederates have caught wind of this event, and see it as a golden opportunity; so they plot an assault to break up the celebration.    The game was designed for 6 players, and I got three folks registered who showed up, and was able to corral three HAWKs into filling the empty spaces.
The mobile part of the Rebel force enters from the nearby woods.
      The Confederates were tasked with three objectives: kidnap General Grant,  steal the wagon full of whisky that had been brought to the celebration, and steal the train carrying the cake.   To help them, they had two steam-powered Mole Machines that would allow two thirds of their force to enter very near the Yankee celebration.
An overview of the table as things get underway.
     At the beginning of the game the Confederate players could put their Mole Machines anywhere on their side of the table behind an imaginary line drawn across the table from the top of the corn field on the Rebel left.  They placed the two machines, one right of center and one further right.  They then rolled a scatter d10 for each machine to determine where it actually came up (its tough navigating underground!) and ended up with both of them almost side by side on the far right.   They then were able to disembark one unit per turn.   The remaining third of the Rebel force needed to enter from a woodline along the Confederate table edge.
Rebel troops start to drag away the Whiskey Wagon, as the Wagon Master charges into combat with them.
    With the Whisky Wagon directly in front of them, it became the obvious first target for the Rebels, and both sides began to converge on that area.  From that point on, all heck broke loose.  A rebel unit got its hands on the Whisky Wagon, but the Wagon Master was right there, and charged into them with a vengeance, dropping Rebs left and right.  Nobody was taking his whisky!  This running battle continued for a short while, but then  a bad die roll and a rebel bayonet, and the Wagon master fell.
The Army Cooks melee with the Electro-Cannon crew.
    Meanwhile, the Union Cooks had charged the crew of a nearby Rebel Electro-cannon, and engaged the crew while they were setting up the weapon.  A multi-turn melee ensued.  With one cook, and a cannoneer locked in continual combat for almost the whole game.  Eventually the remaining cook perished when help arrived to aid the cannon crew.
Another table view as the action reaches it's height. 
      Meanwhile, General Grant had arrived to help regain the Whisky Wagon. Nobody was taking his whisky!  He charged his horse into combat, only to roll a 20 for his Scuffle and so promptly fell off his horse.  The Rebel he was fighting promptly wacked him with his musket butt, knocking him out.  A long battle for control of the unconscious general now developed.
General Grant wades into the fray (in a kepi for a change!)
    As this was going on, the Rebels had the bright idea to bring up an officer in a steam-powered mechanical suit to help pull away the Whiskey Wagon, only to have the mechanical suit fail its Sustain roll right as it reached the wagon. So, it now not only couldn't pull the wagon, it was blocking the troops that were pushing it.  Eventually the crew from the nearby Rebel Volley Cannon had to come and push the immobile officer out of the way of the wagon so it could continue to be pushed by hand.
The Air Cavalry (and Bicycle Dragoons) to the rescue! (Note the lone Union Cook still meleeing in the lower right of the photo!)
      In the end, the Rebels had gotten the Whisky Wagon safely away, but had lost General Grant to a very strong Lady Zouave trooper in the final moments.  Also, the train crew that the Confederates had brought along to drive the train away, had been ambushed and killed by the Union Dignitaries.  So the game was deemed a Union 2-1 victory.  General Grant ended up with a sore head, and no whiskey for his birthday!
The chaotic scene near the end. 
     I have to say, as a GM, this was one of the most fun GASLIGHT games I have ever run.  A perfect combination of players and events.   The outcome of all the victory conditions was up in the air until almost the end, and the many catastrophes and near-catastrophes made for much hilarity.  I look forward to running this game again at Cold Wars.

Fall-In: Saturday Morning In the HAWKs Room

    In the HAWKs room,the action began early Saturday morning at Fall-In with a room full of games and gamers.  Here are a few photos of some of the games
An overview of the room
     I was scheduled to help Buck Surdu and Dave Wood run their double-blind Road to Bastogne game, using 6mm figures and "Look, Sarge, No Charts: WWII" rules.   This was a lot of fun to watch, as gamers play very differently when they don't have the 1000 ft general ability, and know here all the enemy troops are located.
Buck Surdu, in dark blue shirt, gives the rules briefing to the players
      The game set-up was American forces pushing as quickly as possible down the road to Bastogne to relieve the trapped troops in the city.  The Germans have defenders along the road to stop them.
American forces, move cautiously towards their unseen foe
     The Americana pushed across their entire frontage and were never able to achieve a breaktrough; as the Germans continually melted back into the woods as soon as they were spotted and engaged, only to set up another defensive line a little further back.  In the end, the game was a German victory.
A look at the two identical tables for the double-blind game
  Also being run Saturday morning was Kurt Schlegel's Assault on Santa's Village game, using GASLIGHT rules.  This was a crowd favorite with both the kids and parents alike; and it was often standing-room only around the table..
GM, Kurt Schlegel, in yellow shirt, helps one of the young players.

Goblins and evil snowmen move across the town square of Santa's village
   Another Saturday morning game was  James "Tank" Nickle's Battle of Pydna 22 June 168 BC, using 10mm figures and "Bear Yourselves Valiantly" rules.
GM, James "Tank" Nickle, in blue t-shirt, helps answers a player's question

Another look at the forces engaged in the Battle of Pydna
      Also on the schedule was Kevin Fischer's Clash at the River game using 12mm figures and "Mobile Suit Gundam: The Gravity Front" rules.
GM, Kevin Fischer, in tan shirt, discusses the game with one of his players

Fall-In Friday Night: Island of the Lizardmen

  Friday night at Fall-In I ran my "Battle for the Island of the Lizardmen" game, using 10mm figures and "Bear Yourselves Valiantly" rules.  The set-up for the game is that the Dwarves have allied with the Lizardmen in order to gain access to their volcanic jungle island, to use the volcanic power to construct a super weapon.  The Elves have found about about this, and have sent an expeditionary force to put an end to it.
        The game was intended for 6 players, but unfortunately we only got 4.  So, I jumped in to fill  the fifth spot, and an Elf player took two commands. The Elves have three objectives they need to accomplish: destroy the under-construction super weapon, destroy the Lizardmen village, and destroy the Dwarves' encampment.
      Both sides have deployment problems they must overcome. For the Elves, they can only disembark two bases of troops from their boats per turn; and for the Lizards, they have to move their troops through dense jungle to meet the Elvish threat, which greatly slows them down.
   The Elven plan quickly fell apart, as many of their troops became bogged down in fighting the Lizards in the jungle, and another Elf force, attempting a flanking manure, became slowed down by a bridge crossing. Then, due to long range flanking artillery fire from the Dwarven encampment (which the Elves chose to bypass) the Elves crossing the bridge failed their morale check and ended up retreating back over it, just as they were reaching the other side.
     The unfortunate tactical setbacks, combined with very cold Elf dice, resulted in a Lizardman victory; with the Dwarf-Lizard alliance retaining control of all three objectives.
  Everyone seemed to have fun though; and as a GM, it was nice to get a chance to command a few troops on the table as well.