Monday, December 2, 2019

Reaper's Evil Toys Painted

    This past week I painted up Reaper's pack of "Evil Toys" to use as treasure tokens for December's Ghost Archipelago game-slash-Christmas party.  The scenario will be The Island of Misfit Toys, and the players will be trying to gather as many of the toys to "save" them from the island and its evil ruler King Moonracer.
L to R: Evil Rubber Duck, Evil Teddy Bear, Evil Jack-in-the-Box, Evil Cymbal Monkey, My Little Evil Pony, and Slinky Hell Hound. 


      I also painted, to add to the mix, the headless gingerbread-man from Reaper's "Familiars Pack VI"

Wednesday, October 23, 2019

New Old Glory "Wars of Ozz" Figures

  Old Glory is going to be releasing a new line of figures with accompanying rules early next year called "Wars for Ozz"; They are based heavily on the original L. Frank Baum books, but with their own unique twist.  I was lucky enough to be part of the rules development team, and had a chance to get my hands on some of the figures to paint before their general release.
     These are a couple of the Allied units, which can be added to the forces of any of the four major factions in the game: Munchkins, Quadlings, Winkies, and Gullikins.

   The first is a unit of Skeleton warriors.

  And the second is a unit of fierce. Pumpkinmen


     I was really impressed with these excellent figures.  They have a lot of character and were a joy to paint!

Wednesday, October 2, 2019

Reaper Bones 5 Kickstarter Has Record First Day!

   Just wanted to let everyone know that yesterday Reaper launched their Bones 5 Kickstarter with overwhelming success, reaching a record $1,000,000 in only about 7 hours!  The amount pledged is now passed 1,2000,000 and still going strong.  Also, they have reached the 10,000 backer milestone in the first day as well.


      The Kickstarter runs through November 2nd so there is still plenty of time to get on board with these excellent deals!  To find out more head on over to the Kickstarter page:  Bones 5


      Here is a current look at the Core Set; a great deal at $120, and sure to get even better with a whole month left to go!   There are also a lot of great Add-Ons that have been unlocked as well.
(Click to enlarge)


Monday, September 30, 2019

Saturday at the HAWKs BARRAGE Convention

 This past weekend was the HAWK's annual BARRAGE miniatures wargaming convention.  We had a good crowd for both days, and a great time was to be had! Here are some shots of a few of the games on Saturday.  For Fridays, photos, see here: Friday at BARRAGE.

 A Balin's Tomb game.

Ancient Galleys.

Flames of War Tournament

Battle of Hoth

Norman Dean's "The Plains of Peril"

A Gentleman's War

The HAWKs celebrated their 25th Anniversary at the con!

A view of the hall Saturday night.

Mark Morn's "What a Tanker!" game

The Bridge of Khazad-dum.  

Sunday, September 29, 2019

Friday at the HAWKs BARRAGE Convention

   This past weekend was the HAWK's annual BARRAGE miniatures wargaming convention.  We had a good crowd for Friday, and a great time was to be had! Here are some shots of a few of the games on Friday.
Sam Fuson's "Sherlock Holmes and the Case of the Blue Carbuncle" game using GASLIGHT rules

A War of the Roses Skirmish I ran using Feudal Patrol rules.

John Thomasovich's "Smolensk 1941: The Encirclement" game using modified KISS Rommel rules

Bill Slavicsek's Star Wars RPG game using the Star Wars Role Playing Game rules

Rob Dean's Medieval Mayhem game using homebrew rules.


Bill Molyneaux's 55 Days at Peking game using homebrew rules.

Roxanne Patton's Semper Adversor game using Combat Patrol rules

Mike Pierce's Flank Encounter 1862 game using Sharp Practice rules.

Thursday, August 15, 2019

Second Crack at "A Gentleman's War" Rules.

   This past Monday I was able to visit with fellow HAWK, Rob Dean, to have another go at "A Gentleman's War" rules by Howard Whitehouse.   We decided we'd make a day of it, and have 2 battles with a break for lunch between.   Like my first try of the rules, back at the end of July (See Blog Post here), we once again used our 40mm homecast Imagi-nation armies; only this time I was facing Rob's Schoeffen-Buschhagen army, and not his son's Wachovians.
     We wanted to try some of the rulebook scenarios this time, so we rolled for random forces, and then picked a suitable scenario (based on the armies we generated) for the first action.  Rob's force seemed to be of a "Flying Column" nature, and mine was a more balanced Infantry/Cavalry force (though lacked artillery), so we settled upon the Isolated Detachment scenario.
    Rob had set up the terrain beforehand, in a pleasant countryside layout.  Now with a scenario in hand we did a quick arrangement of some of the terrain to create an enclosure for the Isolated Detachment to defend, and we were ready to go.  We made the mistake, as will be seen, of rating the walls of the enclosure as high walls and heavy cover
 
   On to the action:
I was immediately hampered by an inconvenient set up position, hemmed in by two woods, with only the narrowest of clearings between them.  I opted to put my cavalry in the clear terrain to facilitate them getting a quick jump off, and assigned my infantry the task of slogging through the woods.

Things got off to a rough start, as my cavalry, brigaded under General Grotsky, were slow to build up speed (poor movement roll) and quickly came under fire from the gun and infantry in the enclosure.  The 25th Hussars began taking casualties.  Meanwhile the infantry plodded along, emerging from the woods in a state of disorder.

The infantry now came under the enemy guns, and the Hawks' 1st Company began taking losses.  The cavalry by this time had cleared around the enclosure, and attempted to sweep in behind them before reinforcements could appear.  The Hussars had been badly mauled at this point by the cannon and long range infantry volleys from the enclosure.  The sole survivor continued on with his brigade.   Still no sight of enemy on the horizon so the cavalry pushed on.

My infantry moves closer to the walls, and the losses mount.  Unfortunately, I do little damage to the defenders behind their well-built walls. The cavalry moves into position to strike, though they must move fast, as the first  Schoeffen-Buschhagen reinforcements can be seen coming down the road in the distance.
Bravely the first squadron of Dragoons charges the S-B gun.  They take half casualties from the canister fire, but continue on.  A swirling melee develops around the guns, and two more of the horsemen fall, but the gunners take casualties too and the survivor abandons the gun.  With one remaining figure, the Dragoons claim their hard-won prize.


The second squadron of Dragoons does not fare so well. The enemy uses a hold card allowing him to form square, and issues long range fire.  One trooper falls from the volley, and for the rest charging the wall of bayonets goes poorly.  The surviving horsemen Run Away in disorder.   

By now my remaining infantry reaches the enclosure.  One company has been destroyed by fire on the way in, and the second has taken 1/3 losses.   Hoping for a miracle, they throw themselves at the wall, but the results are inevitable. By now the reinforcements have entered the field in mass, and with my cavalry and infantry shattered , the one good infantry company prepares to form a rearguard as I call for a general withdrawal from the field.

    After our lunch break, we came back for our second engagement. This time, we picked a scenario first and chose forces based on the scenario.    We chose the Capture the Bridge scenario, and decide, from a narrative perspective, that it is the start of the campaign season and my North Polenburg forces are trying to seize important maneuver locations in preparation for a general attack.  I failed at clearing the important road juncture in the first game, so now it becomes vitally important that I secure the bridge crossing if I hope to have any chance at moving my armies quickly into enemy territory for my main attack.
     With a scenario in place, Rob opted to roll for a "Garrison" army, and I did a "Main Body".  We weighted my army, as attacker, with  9 units, against Rob's 6 units.  Then, after we had deployed, we decided Rob's troops looked exceedingly vulnerable sitting out in front of the bridge without any cover, so we agreed to let him place some defenses.  Here again, in retrospect, this was a slight mistake, as we once again rated them as +2 Heavy Cover.

Initial deployment. Once again I am plagued by a terrain-filled deployment area, having to set up between a couple woods, and a farm.  This causes me to have to stack some of my infantry for entry.  I set my cavalry on my far left to try and take advantage of the open area, and the bulk of my infantry on the right in hopes they can swing around the right of the defenses. I set one battery between the two groups of infantry and the other on the left between the cavalry and the end of the infantry line.  I set one general to operate a cavalry brigade on the left, and the other to operate an infantry brigade on the my right.

My attack sets off.  On my left the cavalry pushes across the river, as the cannon on their right does a series of prolong and fire moves.  Rob's light infantry and gun on his right fall back in good order as my cavalry advances.  On my right, I once again slow down as I try to shake my stacked infantry out into a line as they emerge disorganized from the woods and farm. My cannon with the infantry also does prolong and fire moves, but does nothing against the defenses.  Rob's gun however begins to chip away at the Queen Jennifer Regiment in the center.

 The Queen Jennifer Regiment in the center continues to push forward, taking increasing casualties. The second company breaks and flees back to the woods.    However, to the left of the QJ regiment,  I have managed to get one of my cannons into position in a field behind a stone wall, where it has an excellent flanking field of fire on the enemy defenses.  Meanwhile, my cavalry has pushed across the river, but long range fire from their cannon, combined with an orderly firing withdrawal of their light infantry, has taken its toll on the Dragoons, who are reduced to one figure. Rob withdraws his half section of Lights on his right flank and send them to rejoin the other half of their unit over on the left, as my Infantry line begins to advance and nears the woods on the left flank of their defenses..

The 1st Co. of the Hawks Regt. finally gets close enough to the woods on the enemy left to charge their Lights.  The Lights issue a volley and flee back out of the woods. I capture it, but am disorganized. The Hawks 3rd Company has been reduced to a third of their strength under the withering fire as they near the breastworks; while the artillery accompanying the regiment continues their series of prolongs and fires. Meanwhile, over on my left, the cannon behind the wall continues to pound the flank of the enemy works, inflicting constant casualties on the defenders.  However, with the stalemate between my Hussars and their Light Infantry, their cannon on their right decides to turn and lob long range counter battery fire at my gun in the field; first one gunner is hit, and then a lucky shot hits an ammo chest and takes out two more in one turn.  Only one gunner is left to man the gun and his time is limited. 

Foolishly, I try to break the stalemate, and send in my Hussars. The Light Infantry form square, and the result is devastating on my horsemen.  


Things go poorly on my right as well, as the enemy Light infantry that fell back before my charge, now form skirmish and reenter the woods, a volley sends my disorganized troops fleeing out from the trees.

I manage to get my gun all the way up to their works, and a final point blank volley sends the defenders running away.  But it's too little too late.  

As I try to maneuver my one good Infantry company into position to take the abandoned defenses. Their Lights form to defend them, and their infantry that fled thinks better of it, and is already returning.  My chance is lost, and with my troops too weakened now to press the attack much longer,  and the daylight hours fading, I once again sound the withdrawal.
An enjoyable pair of games!  I've learned some good lessons about heavy cover in this game, and the abilities of Light Infantry.    I think we had rated the cover in both games as +1 I would have had a better chance.  But such is the fortunes of war.
     We now figure my North Polenburg forces are falling back to lick their wounds, and that since my initial attacks have been beaten back, it is Schoeffen-Buschhagen's turn to seize the initiative.  I must strengthen my frontier as I expect their reprisal any day now.

Monday, July 29, 2019

First Game of "A Gentleman's War", Using Imagi-Nation Armies

I got to play my first game of "A Gentleman's War" (AGW), by Howard Whitehouse and Danial Foley, this past Saturday under the GMing/tutelage of fellow HAWK Rob Dean; with his son Norman Dean as my opponent.  We used forces drawn from our homecast 40mm 18th Century Imagi-nation armies, normally used with the classic Charge! rules; my North Polenburgers, vs Norman's Wachovians.  We used the random force generation from AGW, which, when rolled up, looked to us to be some sort of pursuit scenario of Whachovians trying to overtake a retreating North Polenburg army, and being met by a North Polenburg delaying force.
     Wachovia had a flying column consisting of: 3 Light Cavalry units, 2 Light Infantry units, and 3 Line Infantry units; while my North Polenburg army had: 3 Line Infantry units, 2 Field Artillery batteries, a Light Cavalry unit, and a Light Infantry unit. So after a brief scenario discussion, we ruled Norman's army needed to exit 4 of his 8 starting units off my table edge, and I had to prevent this with my 8 defending units. It was an exciting battle with the fortunes seesawing back and forth and the outcome undecided until the last turn.
North Polenburg Initial Deployment
     We both sketched out our opening deployment on paper, and then set up our troops as per what we had drawn.  This allowed us to set up simultaneously, though we were locked in our deployment without having any idea of how the enemy was deploying.
     I set up symmetrically with my Line Infantry brigade in the center to block the road, with a Light Infantry Unit and Artillery Battery on each flank; figuring the maneuverability of the Lights, combined with the long range of the cannon, could help deter any attempt to sweep around my flanks. I deployed my Light Cavalry in the center, behind my Line Infantry, where I hoped it would be in position to catch anything that got by the Light Infantry and Artillery.  I had hoped to push forward quickly to give myself more room to delay them farther from where they hd to exit.  This did not happen.
Wachovia Initial Deployment
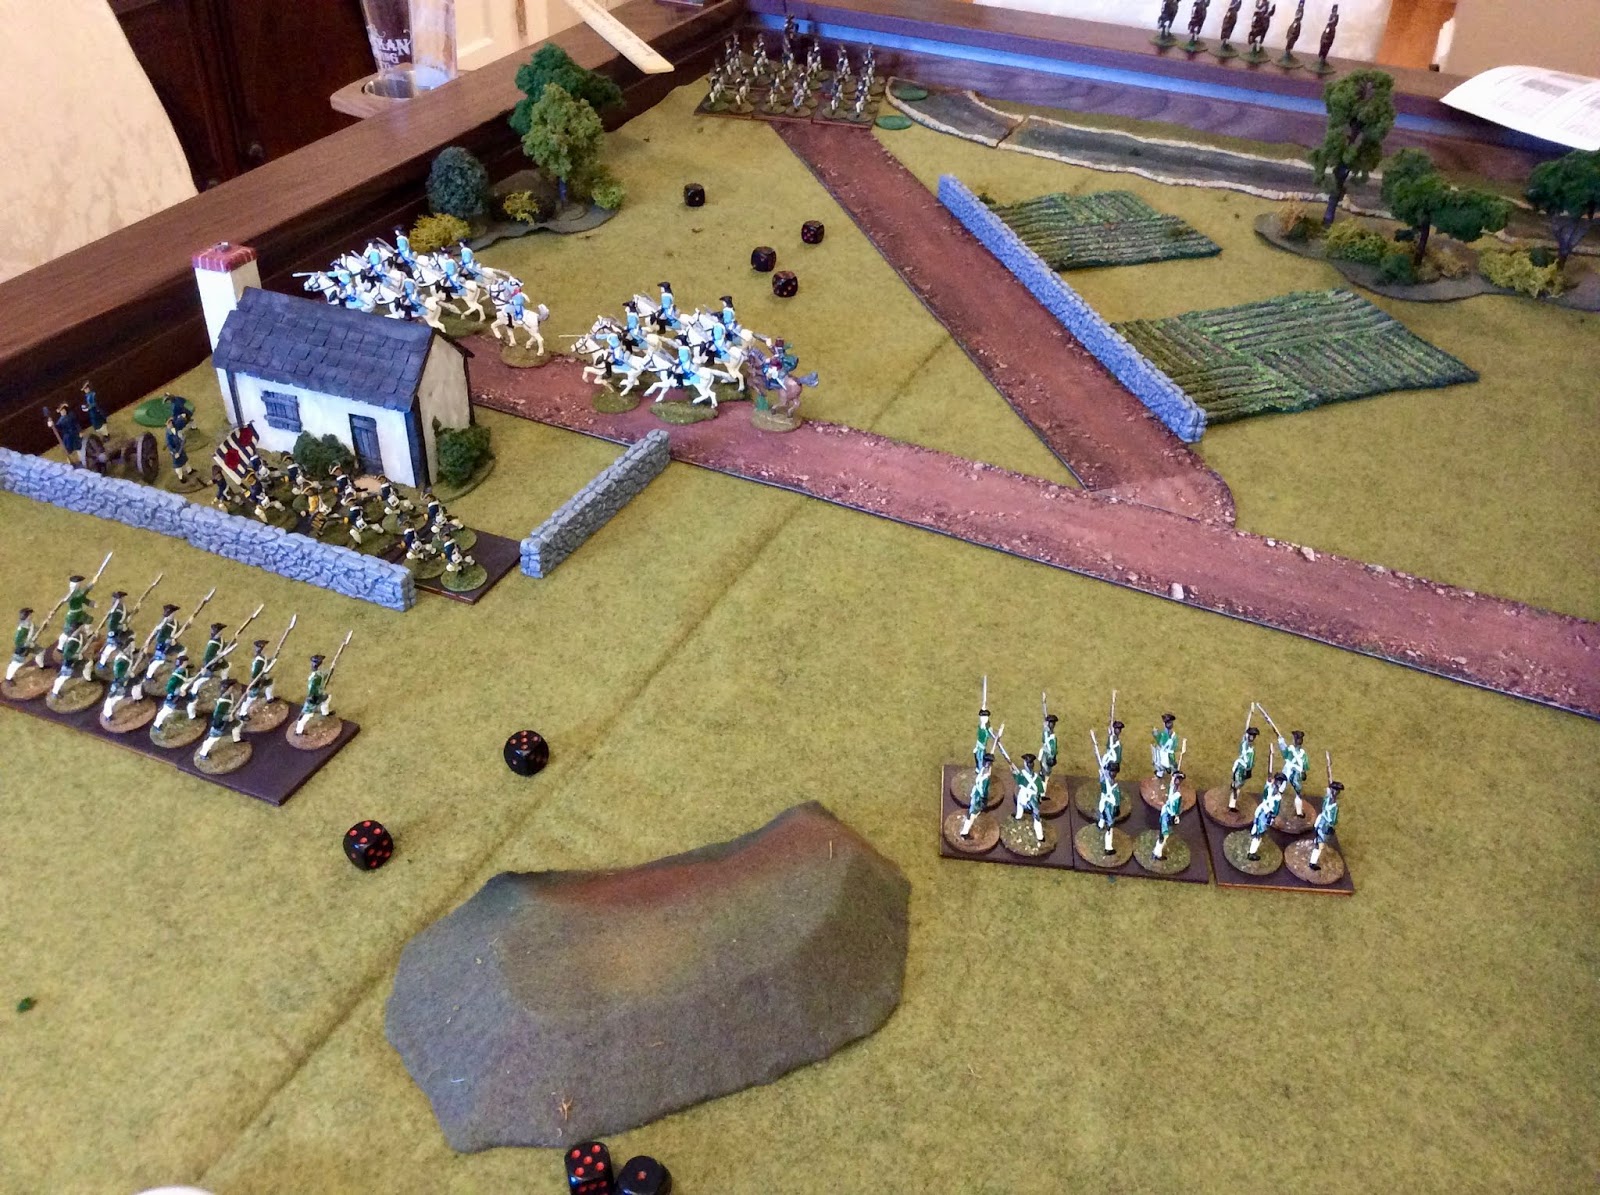
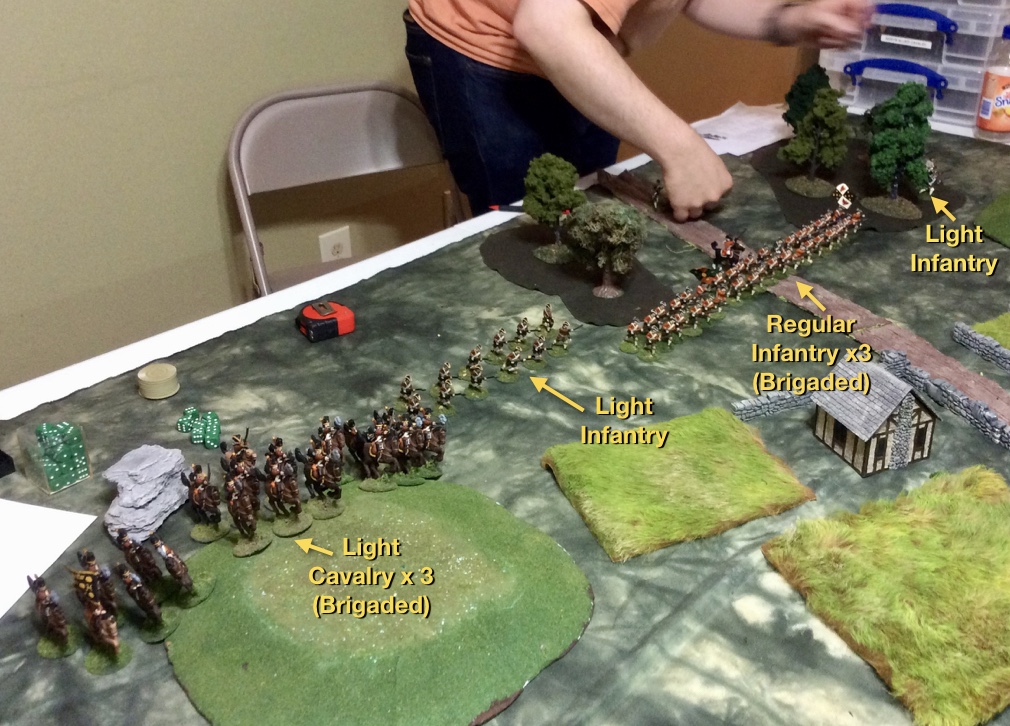
      Norman set up somewhat similarly, with his Line Infantry straddling the road, with a Light Infantry unit on each side.  He brigaded his Light Cavalry together, and set them up just below a low hill on his right.  It was clear his plan was to punch a hole through my left flank with the mass of cavalry at his disposal.
The brigaded Wachovian Light Cavalry come thundering over the hill towards my Light Infantry and Artillery on my left.
      Things started off ominously for North Polenburg, as Norman's Wachvoian's got the 5 first Activation Cards, allowing his cavalry to come storming over the hill, and smash into my Light Infantry holding the left flank.  My lights repulsed the first unit, leaving both units bloodied and the Cavalry falling back on the field in disorder, but the second fresh unit of enemy cavalry swept them from the field.  This left my Artillery extremely vulnerable.  Luckily, the charge of the third unit of enemy cavalry fell less than an inch short of my cannon, allowing me to let fly with a round of canister at point plank.  While it didn't have as big an effect as I wanted, it did disorder the horsemen.
A swirling battle develops and I turn my left Line Unit to help secure my flank. before my Artillery is overwhelmed. 
      Quickly, I was able to swing around my leftmost Line Infantry unit to face the enemy cavalry and protect my line; but it was an inevitable fate for my guns.  The remaining enemy Light Cavalry swarmed over them.   My Light Cavalry now also moved to protect the flank, as the enemy cavalry found itself all disordered and spread over the field.
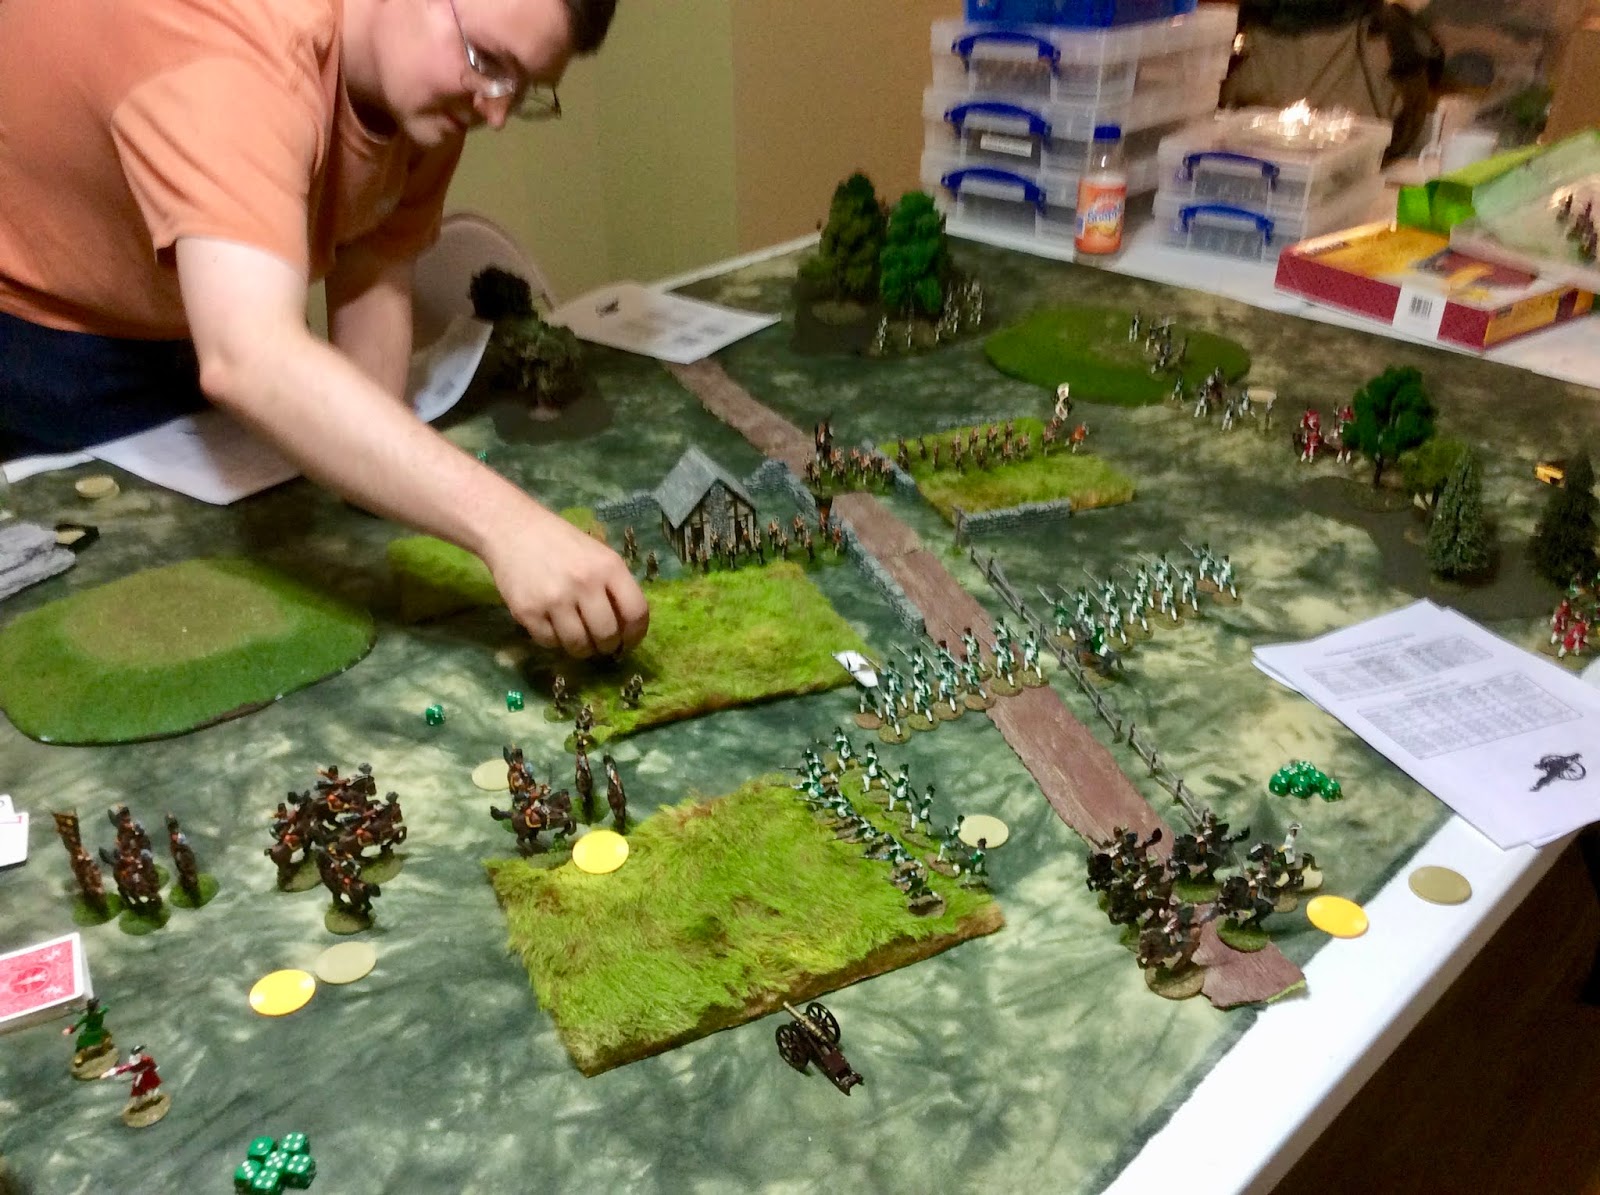
Overview of the table about midway through the battle.
      My infantry shot a few rounds at the closed unit of enemy Light Cavalry as my Light Cavalry charged another.  The Wachovian horsemen countercharged and we met over the silent cannon of my battery.  In a fortunate turn of fate, I not only caused a number of casualties on the enemy, but the attached General with them was mortally wounded.
Cavalry vs Cavalry over the silent guns, and the enemy General falls.
      Meanwhile, on my other flank, my Light Infantry unit and Artillery battery had, from the beginning of the battle, been pushing forward while conducting long range harassing fire.  They had finally worked their way onto the flank of the enemy and were close enough that they were becoming a serious threat.  The Wachovian Light Infantry finally felt the need to come forward and discourage me rather than sit as a potential threat in the safety of a nearby woods, and my Lights found themselves split between fending off their enemy counterparts on a low hill forming the enemy right flank, and  sniping at the enemy Line Infantry in a nearby field.
Action on my right flank as I get dangerously close to their line, and their Light Infantry come forward from the security of their woods.
      With my left in an uneasy state  and the remnants of three enemy cavalry still on the field, the Wachovians seized the opportunity and were able to push a unit of their cavalry off my table edge, achieving their first victory point.  However, with a bit of luck, I was able to stabilize my left flank enough, to drive off the remaining two enemy cavalry units using my own horsemen and fire from the Line Infantry unit I had turned to face them.
     However, the distraction of dealing with my collapsing flank had allowed the other unit of the enemy Light Infantry, and their brigaded Line Infantry to get very close to my Line Infantry; the Lights pouring fire in the turned flank of my leftmost Infantry unit, and the brigaded enemy infantry firing at my infantry with a numerical advantage.
I prepare to drive off the last of their Cavalry, as their Lights rush forward on their right to stabilize their line.
       At that point a disaster happened on my right flank, as an effective volley from the enemy Light Infantry on the hill caused my lights to fail morale and fall back.  Their path carried them directly into my artillery, effectively blocking its fire.    The enemy Lights then seized thier opportunity, and raced passed my disorganized troops towards my table edge.  My guns were only just able turn in time to issue one round of ineffective fire, before the enemy Lights made the table edge, and were off.   A second victory point achieved for Wachovia.
Disaster hits, as my Lights fall back off the hill into my battery. Everybody's disordered.
      The end came quickly after that.  I was able to drive off the enemy lights on my left, with an effective charge; but the charge took my infantry unit well past the enemy line, and they were never able to get effectively back into action.  This left only two of my Line Infantry, and the remnants of my Light Cavalry, to hold the enemy line of three Regular Infantry units.  While my remaining Artillery and Light infantry were able to issue a few ineffective shots, their pursuit of the fleeing enemy Lights on my right had taken them far enough away from the center that they were't able to play an effective part again.
      With masterful use of the Hold cards, a well timed charge,  and good fire and morale results, the enemy was able to one by one eliminate my two blocking infantry units.  This left them with enough firepower to brush my cavalry aside, and evade my remaining light infantry and artillery; escaping off the table for the 2 remaining victory points and thus winning the game.
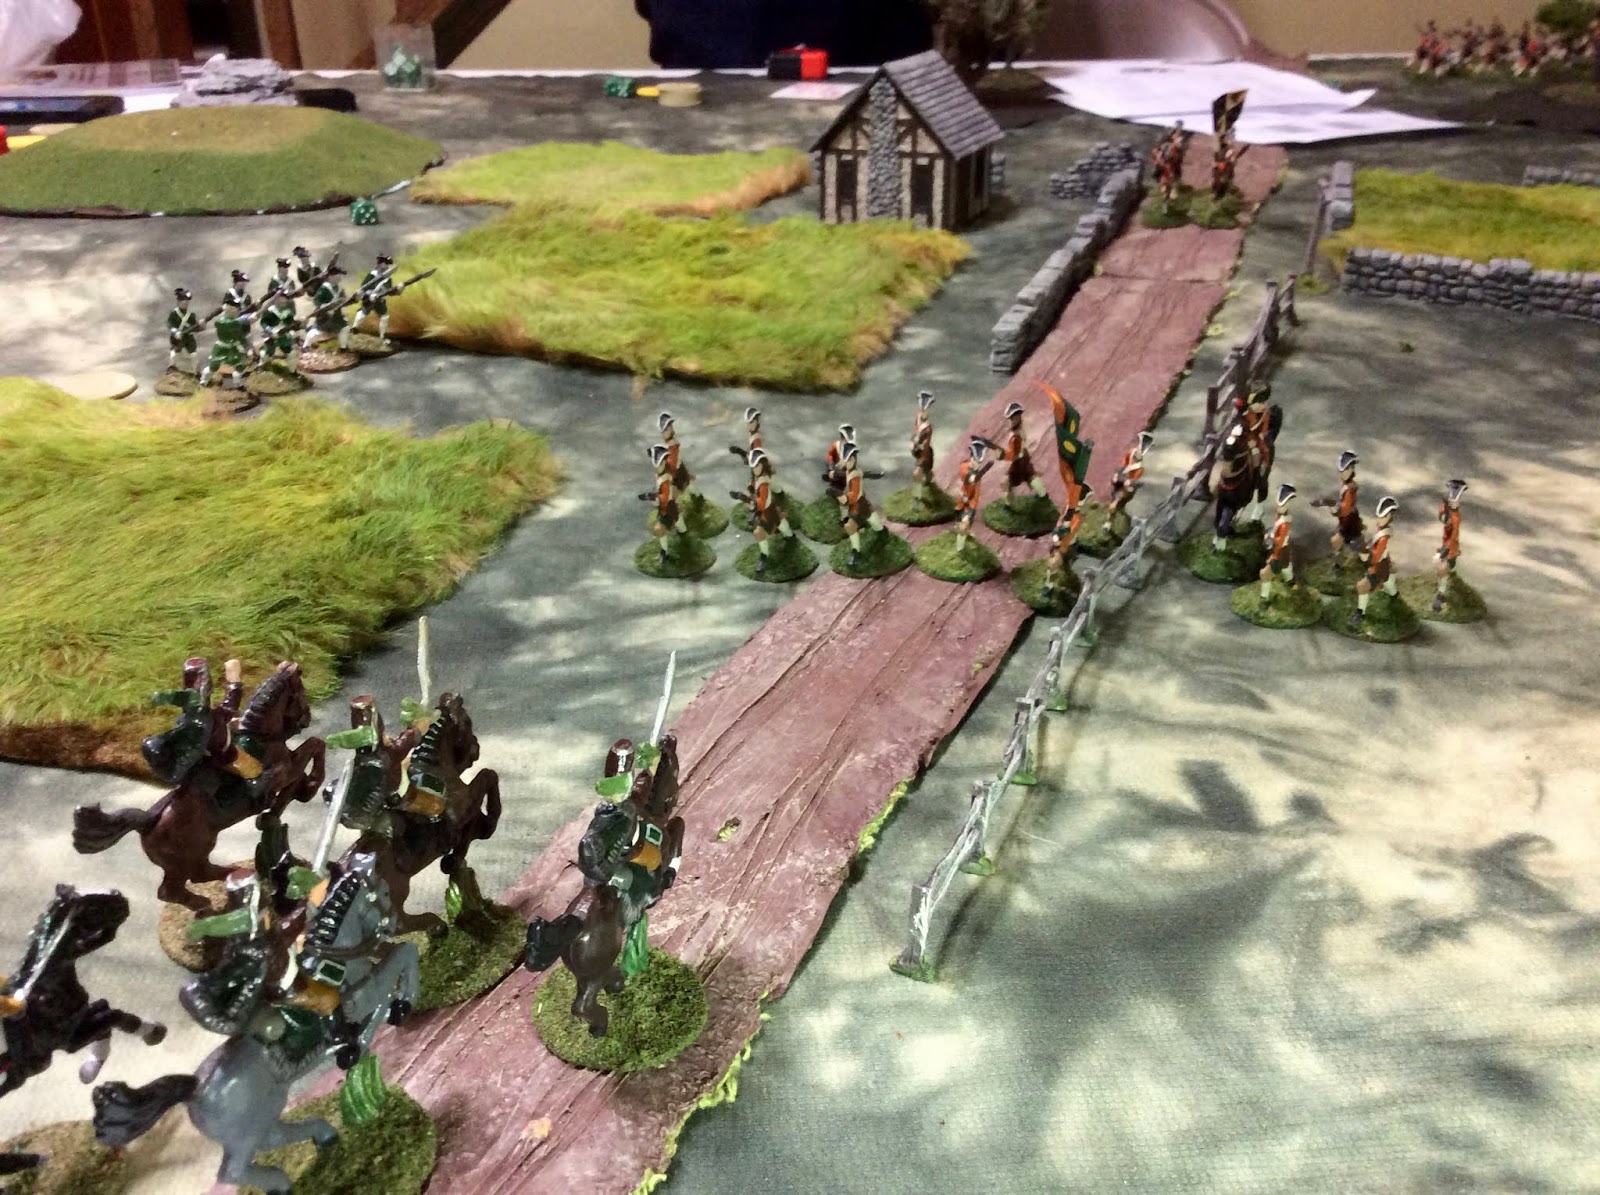
The end, as my Cavalry tries to futilely hold the road.
     While the game started off with some bad luck with the activation deck for my North Polenburg forces, things soon swayed in the other direction; and the fortunes of war swayed back and forth throughout.  While initially the enemy felt confident following his destruction of my left, things soon turned my way with the reestablishment of my left and the advance of my cannon and Lights into close range on his right.  It looked like I would be able to overwhelm him with firepower.  Then, with the breaking of my Light infantry on my right, and them falling back into my artillery, things seemed to sway back towards the enemy.   The battle then came down to the desperate fight in the road, and in the end, I think my inexperience with the rules, lost me the day.
     Nonetheless, I had a great time and look forward to having another crack at these fun rules. They really have a great old school feel to them and seem the perfect thing for Imagi-nations and big "toy soldiers".