Showing posts with label scenery. Show all posts

Monday, January 29, 2018

Some Ghost Archipelago Spell Effects

    As I posted earlier, a couple weekends ago, I helped run a pair of Ghost Archipelago games at our club's regional miniatures gaming con.   Before the games though, I had to build some of the spell effects for the Wardens I planned to use  in the game.  Specifically, some Earthen Walls and Pits for an Earth Warden, and some Pools for the off-school spell of a Storm Warden.
     I began by making the pits, since they seemed like they would be the easiest.   I began with some 1.5" fender washers, first gluing a bit of paper over the hole in the center.  I then used some greenstuff to build up a rim around the outer edge.  When the greenstuff was dry, I sprayed the pits black, and then painted them with shades of brown, leaving a bit of black in the center to give the illusion of depth.

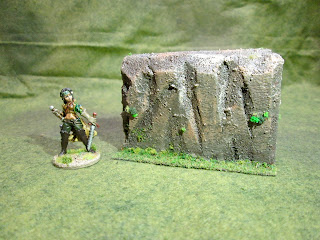
     For the Earthen Walls, I cut the basic 3"x2"x1" shape from some scrap pink insulation foam, and carved it to give it a rough appearance as a pile of dirt might have.   I then glued it to a 3"x1.5" steel base.    When the glue was dry, I painted the walls with a paint and sand mixture to give it some texture, and then sprayed the walls with some Flat Dark Brown camo spray paint.   When dry, I drybrushed some lighter browns over the surface.
  When they were dry, I flocked the bases, and added some bits of flock and static grass here and there on the walls. 

     
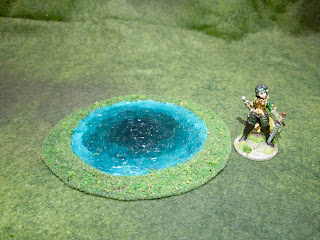
     For the Pool spell, I took some CDs, and cut them down a little to give them an uneven outline.  I then cut some 3" circles from some heavy paper.
          Next, I glued the heavy paper to the CDs, and then ran a ring of thick Tacky glue around the outer edge of the circle to make an edge for the pool
     When everything was dry, I sprayed-primed  them black.
     When the spary was dry, I painted the pools to look like deepening water.
     When the paint was dry, I flocked the bases; and when the flock was dry, I covered the pools with a layer of Woodland Scenics "Water Effects".
     When the "Water Effects" dried it gave the nice illusion of water in the pools. 

       I'm really happy with how these turned out, and they really helped add to the look of our convention games!  


Thursday, September 7, 2017

Frostgrave "Thaw of the Lich Lord" Bone Wheel: Simple Halloween Scratchbuild

    This past week I assembled a prototype Bone Wheel terrain piece for the "The Bone Wheel" scenario in the Frostgrave supplement book, Thaw of the Lich Lord.    Since we usually have 6-8 players in our Frostgrave Campaign games, I intend to make three more of these now that I have finished the prototype.
     The scenario describes the Bone Wheel as, "A gigantic wheel, sitting some eight feet off the ground on a central axle...the wheel is constructed of human bones, bound together with old leather straps..."   I knew there was no way I was going to make a big wheel out of 28mm bones, as it would take hundreds, so I headed to the local Dollar Tree store in hopes of finding something that would be bigger than 28mm but not so large that it wouldn't look too out of place with 28mm scenery and figures.
    Happily, I found a skeleton Halloween garland that looked like it would suit the purpose perfectly.
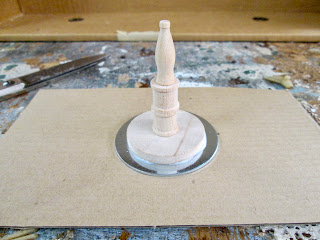
   But, before I built the wheel, I wanted to make the central axle.  So I dug through my wood bits box, and found some pieces I thought would work; a disc, a couple small spools, and a small soda bottle shape.  I glued those in a stack on a 2" fender washer.
    I then cut off the skeletons' arms and legs, and then cut the feet of the legs.    Next, I hot-glued the legs to a 1" fender washer, and then hot-glued the arms around the outer edge.
      I decided the center needed some sort of cover piece,  so I cut one of the ribcages in half, and glued that to the center.  I then did a test fit of the two parts.
      Happy with the fit, I used some of the string that came with the garland to make some lashings around the bone junctures, where the central spokes met the outer rim bones. I then sprayed the parts with flat black primer.  And, as seen in the photo below, I began drybryushing the central axle with some aged wood colors.
          It was just a matter of finishing painting everything, and then fitting the two pieces together.
Shown with a 28mm Reaper figure for scale.
    I'm happy with how the project turned out.  Since this is a scenery piece that will probably only ever be used for this scenario, I didn't put a lot of effort into it.   Still, for a quick job, I think it looks pretty good.

Friday, April 28, 2017

Quick and Easy Cardboard Game Piece Frame Sci-Fi Building Ruins.

   So, a while back I saw someone's blog entry where they made some neat Sci-Fi ruins out of the cardboard frames that are left over after you punch game counters out of them; and ever since I've been looking for an opportunity to try it.  Then, I was with a friend a while back who was punching out the counters for his newly purchased copy of the Congo ruleset, and I asked if I could have the remaining cardboard frame left after all the counters were punched out.
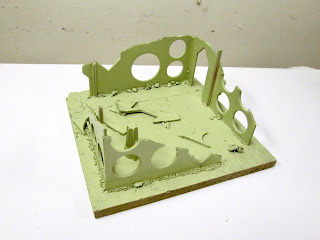
     I first cut the frames into sections to look like partially destroyed walls, and glued them on to 6" x 6" cork tiles.  I made one 6" x 12" base by gluing two of the cork tiles together, in order to make one larger building.  I then added a few odds and ends to the walls using some dollar store lego and other plastic bits.

 I first gave them a base coat of some old Army Painter "Necrotic Flesh" I had on hand.
     When that was dry, I gave the ruins some burst sprays of some Krylon "Aqua" Sea Glass paint I had been wanting to try out.  I think it gave an interesting "alien" effect.
     I then painted the slabs with Americana "Terra Cotta".   I think it adds to the alien look.
    I added some other colors here and there to the detail bits I glued on earlier.  Then I slathered the ruins in some Citadel "Nuln Oil" wash, using a wet brush.  When that was dry, I drybrushed them with Americans "Bleached Sand".   Lastly, I sprayed them with some matte varnish.
Shown with some Reaper 28mm Sci-Fi figures for scale.


     I'm really happy with how these turned out.  They are't too complicated or detailed, but I think they'll look good on the table.   I especially like that they're made from what would have been trash. :)

Monday, February 13, 2017

Dollar Tree Fairy Garden FInds!

     Anyone who has visited a craft store in the last couple store knows that Fairy Gardens have become a big thing recently.  Fairy Gardens, are little scenes you set up in a planter or other garden space, using model houses, and small decorative objects such as furniture, yard ornaments, etc., to make it look like a fairy lives in that spot.   Well, the Dollar Tree has jumped on this bandwagon with their new Spring line; and on a recent trip there, I picked up some of these goodies to see about converting them for Fantasy gaming use.
They had tree different carded sets of figures: these mushrooms, some fairies that were the usual poor Dollar Tree quality sculpting but possibly usable (statues maybe), and some little animals (turtle, butterfly frog) that unfortunately have all sorts of flowers and other bits sculpted on them (Like the gazebo above) and are a bit cartoonish.  I also got the twig and leaf gazebo shown above from the assortment of buildings they have. (Shown with a Reaper 28mm figure for scale)

Here is a shot of the assortment of structures they are selling for the Fairy Gardens.  Thye are the typical poorly painted Dollar Tree fair, but may be usable with a new coat of paint.  I may go back and pick up one of those mushroom houses to try and spruce up.

They also had these succulent sprigs that will make good jungle or sci-fi vegetation. (Shown with a Reaper 28mm figure for scale)

Thursday, February 9, 2017

GW Vampire Count's Coven Throne Converted to Frostgrave Monument

    Last year I got a good deal from a friend at a local game convention flea market on the Games Workshop "Vampire Counts Coven Throne".  It's such a crazy over-the-top model that I thought it might make a really cool basis for a monument statue for our Frostgrave games.   Something along the lines of the Wellington Arch in London, but more over the top.

Wellington Arch
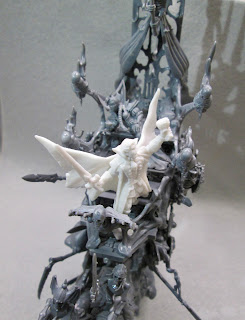
  I began by assembling the model as per the instructions, which was a daunting task with there being 15 pages of diagrams and over 20 steps!  And so many little parts!  Rather than do it in one sitting, I broke it up over several days, doing a step or two each day.
   While I was building the model, I also worked on assembling a pedestal for the finished product to sit upon, using a juice lid, some round bases, a bit of chain from the bits box, and some Hirst Arts skulls.
   I made a few modifications to the model before I completed the assembly; mainly I didn't use the large bowl of blood that is intended to sit at the front of throne, instead replacing it with the lectern that is included as part of the Mortis Engine version of this model.   I also decided to use just one of the figures that was included; the reclining female vampire, though I replaced her head with one of the other heads as I just wasn't a fan of the 18th century hairdo on the intended head.

   My plan as far as figures went at this point was to build on an idea mentioned in the Frostgrave rulebook Bestiary, that says in the city of Felstad some Vampires rose to be powerful wizards in their own right .  So I got the idea to make the monument be one constructed by one of these prominent wizard-vampires, depicting him and his apprentice in the heyday of their power.  So I ordered a Reaper Bones vampire figure to stand at the front of the throne, with the idea the reclining woman in the back would be his apprentice.
   When I finished the model and set it on it's pedestal, I just wasn't impressed with it, and I realized I needed to make a larger structure for it to sit upon if I really wanted it to have the look of the Wellington Arch.  So, I assembled a quick and simple four-sided structure from foamcore, a plaster dungeon tile, and some plaster arches I had.  I also had the idea to glue a metal base to the top of this structure, and magnets under the pedestal base, so the piece could easily be broken into two parts for storage.
     I painted the structure black and did some white striations and splatter on it to make it look like it was made from black marble.
     I then primed the monument portion with flat white spray paint.
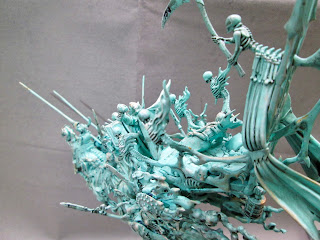
      When the primer coat was dry, I painted the monument and the skulls on the pedestal with Americana "Sea Breeze", then gave it a wash with Citadel "Nuln Oil" and "Agrax Earthshade" washes.  When the wash was dry, I gave it a light drybrushing with Folk Art "Celadon Green", and then with some Cermacoat "Bronze".  The rest of the pedestal I painted black.
     I'm really happy with how this piece turned out! It is really a beautiful model kit to begin with, and is just overflowing with rich details.  I enjoyed painting it, just because it gave me the chance to explore more of the excellent sculpting that went into it.  I can't wait to have the opportunity to use it in a game.


Friday, January 27, 2017

A Pair of Simple 28mm Sci-Fi Storage Tanks (Testing a Chipped Paint and Rust Technique)

    We bought a package of cheap plastic ornaments at Michael's this past Christmas, and I commandeered two to make a couple of simple storage tanks with the goal of trying out a chipped paint and rust technique I had seen on Youtube.
   I began by gluing the ornaments cap-down onto a pair of small plastic cups, after first cutting holes in the bottoms of the cups to fit the ornament caps into. I then glued the cups to 1.25" fender washers.  When all the glue was dry, I sprayed the finish storage tanks with flat white spray paint.
      I then painted the bases and the undersides of the tanks with Ceramcoat "Walnut", and then added splotches of Americana "Terra Cotta", to give a weathered rusted look.
      Then when the rust paint had had a day to dry, I prepared a jar of kosher salt and can of hair spray, that I had purchased a while back at the local Dollar Tree store for this purpose.
      I liberally sprayed the bases and underside of each tank with the hair spray, and while the hair spray was still wet, I sprinkled the areas with the kosher salt.
      I let everything dry overnight, and the next day I sprayed the storage tanks with a khaki tan spray paint
      I then weathered the tanks with a wash of Citadel Agrax Earthshade" wash,  applied with a wet brush, carefully so as not to dislodge the salt.  When the wash was dry, I drybrushed the tanks with Americana "Bleached Sand".
     I let everything dry overnight, and the next day I ran the storage tanks under a weak stream of warm water as I gently scrubbed at the lower ares with an old soft toothbrush, to remove the salt.  When everything had overnight to dry, I gave them a spray varnish with Testor's Dullcote.
Shown with a 28mm Reaper Nova Corp Sgt. for scale.

     I am really happy with how they came out.  They're not perfect, but it was a good learning opportunity for the process.   I'm looking forward to making some more things I can try this on.