Please note, the rules, point values, modifiers etc., are still being tinkered with, so all of those that you see mentioned here might not be exactly what's used in the final version. The general mechanics of game play should however remain the same.
The rules can be played one on one, or with teams of multiple players on each side. In general, each player commands a Brigade consisting of 25 points worth of troops. Brigades are usually comprised of troops from one of the four main factions: Munckins, Winkies, Gillikins, or Quadlings, and these can be supplemented with an assortment of allied troop types.
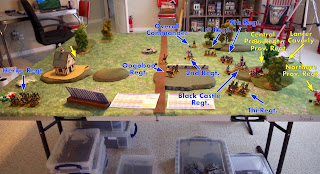
In this game we did the Attack/Defend scenario from the rulebook. For this scenario, Greg, who would be in the roll of attacker, would command two 20 point Brigades; one Winkie and one Gilliken. I, as defender, commanded a single 25 point Brigade of Quadlings. The table layout was generated as per the rules outlined for this scenario in the rulebook, using the selection of 20 half-maps in the book. Victory would be determined by points: 5 points for controlling the hill in the center with the wall, and 1 point for each enemy base eliminated.
Allied Force
Generic Overall Commander 0 points
Gillikin Brigade
1) Brigade Commander, generic 0 point
2) 1st Regiment 5 points
3) 2nd Regiment 5 points
4) 3rd Regiment 5 points
5) Medium Artillery 5 points
Total: 20 points
Winkie Brigade
1) Brigade Commander, generic 0 point
2) 1st Regiment 4 points
3) 5th Regiment 4 points
4) Herku Regiment 4 points
5) Oogoboo Regiment 4 points
6 Thi Regiment 4 points
Total: 20 points
Quadling Brigade
1) Brigade Commander, generic 0 points
2) South. Prov. Regiment 5 points
3) Cent. Prov. Regiment 5 points
4) North. Prov. Regiment 6 points
5) Light Cavalry 5 points (Note: We used a Munchkin unit for this, as Buck didn't have a Quadling one, but we used the Quadling stats for it.)
7) Light Artillery 4 points (Note: We used a Winkie model for this, as Buck didn't have a Quadling one, but we used the Quadling stats for it.)
Total: 25 points
Briefly, activation is handled in the following way: each Brigade Commander has a pool of d6 dice, one for each unit in his command. At the beginning of the turn these are rolled and placed by the leader in a dice pool for each unit within his command radius. Each unit that is out of command radius rolls its d6 individually and places it by the unit's leader. A deck containing cards numbered 1-6 in red and 1-6 in black is then shuffled and placed on the table face down. Play begins with flipping cards one at a time. As the card numbers are revealed, if the commander has a die with that number, he can assign it to one of his units, and that unit can activate. In cases where both sides have units with the same number in close proximity, each side should be assigned a color (red or black) at the beginning of the game, and what ever color the card is is the side that goes first. (For this game I was assigned Red and the Winkie/Gilliken Alliance was Black.) Movement is a set amount, plus the amount of the highest of a 2d10 dice roll.
Like my previous reports, Buck took photos of the table at the halfway point (after 6 activation cards were drawn) and the end of each turn.
(Click any photo to view larger)
 |
| Set up positions at the start of the game. |
 |
| End of Turn 1, Part 1 |
 |
| Turn 1, Part 2 |
Over on the Gilliken front, as expected, their battery unlimbered and began to send rounds into my Southern Province Regiment. Luckily, their initial shots had no effect.
 |
| Turn 2, Part 1 |
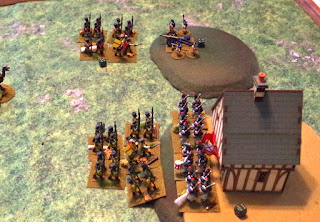
In the first half of Turn 2, the Winkies continued to press the attack, with the Oogoboo Regiment moving into position to attack my battery, and the Herku Regiment going after my Central Province Regiment who had moved out of the cover of the farm. Luckily, the Quadlings of the Central Province came to their senses and were able to reorder themselves and move back up into the farmstead.
Meanwhile, the Winkies of Herku caught my battery off guard, and the artillerists did not issue effective close range fire. The green-skinned warriors closed into melee with their glinting spears and dispatched one of the gunners, while driving the rest back 4 inches in Disorder.
 |
| Winkies move to attack the Quadling battery and the Central Province Regiment in the Farmstead. |
The Quadling gunners found the loss of their precious cannon unbearable, and in a fit of madness charged the WInkies to regain their gun! The Winkies caught by surprise at the charge of the mad gunners, fought valiantly, but the Artillerists managed to drive them from the battery, and the green-skinned warriors themselves fell back 4" in Disorder.
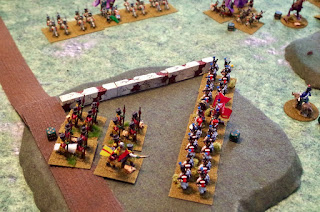
Over on my right front, I knew I could not let the Gilliken cannon shell my line with impunity, and the only resource I had to stop it was my Lancers. So I gave the order for them to charge forth from behind the woods. It was a long distance, but I rolled well; they managed to reach the gun with barely an inch to spare. The Gilliken artillerists let loose with a close range canister shot, and an entire base of cavalrymen evaporated. However, the Lancers passed their test to close and they had at the gunners with their long steel-tipped weapons; killing four of the enemy crew, and driving the last one away in rout. The Gilliken infantry regiments continued to press determinedly forward towards my Southern Province Regiment holding the hill on my right flank, and the Northern Province Regiment in the center.
 |
| Turn 2, Part 2 |
As the Oogoboo regiment reordered themselves after being driven from the Quadling battery, the Thi Regiment came forward and charged the guns. My fire as they closed was less than effective (I was down a gunner), and this time the green-skinned enemy was out for blood. They took out three more of my gunners, and sent the sole survivor running. The battery was lost for good this time.
 |
| Oogoboo Regiment makes an attempt to dislodge the Northern Province Regiment |
Over on my right, the Southern Regiment was being hard pressed by both the Gilliken Black Castle Regiment and the 9th Regiment, who took turns tag team charging me. I'd drive one back then the other, and I had to give ground as well, falling back into the woods at the rear of the hill; but the Regiment held. I was whittled down to just two bases, but I was still on the field, and both Gilliken units had gotten bloody noses.
Meanwhile, my Lancers, reformed from having captured the enemy battery, and turning, saw the rear of the enemy Black Castle and 9th Regiments right before them; and the flank of the 2nd Regiment just a little further way.
 |
| Turn 3, Part 1 |
Sensing the initiative, the Southern Province Regiment marched from the cover of the woods and retook the edge of the hill, then fired down at the Gilliken 9th Regiment.
 |
| Turn 3, Part 2 (The only good shot we got of this part of the game was from the Quadling side of the table) |
In the center, the Thi Regiment, charged the Northern Province, getting enough distance in their movement roll to hit my unit in the flank. The green skin warriors fought like madmen, and sensing the end was near, the Northern Quadlings broke and ran for the hills, with the Thi fighters in hot pursuit.
To add the final nail in the Quadling coffin, a feeble volley of musketry from the Gilliken 2nd Regiment was enough to convince my Lancers that they had earned their pay for the day, and they too turned tail and ran.
At that point we decided to call it a game. It turned out to be a fun match, with the Winkie/Gilliken alliance getting the 5 points for the hill. When the casualty bases were counted, and added with the points from the hill, it was 27 points for the Gilliken/Winkies and 24 points for my Quadlings. A pretty close game. It was also one of the most exciting games of "Wars of Ozz" I've played, with the fortunes of war going back and forth between the two sides.
This game was such a success we're going to try something even bigger this weekend; doing a 4 player game. Buck will once again act as gamemaster, and one of the players (Chris Abbey) will be taking part from England! Stay tuned!


No comments:
Post a Comment