Showing posts sorted by date for query Dollar store. Sort by relevance Show all posts

Monday, July 2, 2018

Scratchbuilt Hanging Pirate Cages for Ghost Archipelago

    These past couple weeks I worked on building some hanging pirate cages for our Ghost Archipelago table.   Awhile back I saw someone else's post about making these, and though I couldn't remember where, they are simple enough that I thought I'd attempt them from memory.

    I started out by getting a pack of hair rollers at my local Dollar Tree store.
     I also went to my local craft store and bought some necklace chain and jump rings in the jewelry section.

     Then, back in my workshop, I retrieved a pack of Dollar Tree mini ornaments I had bought last year to make some 10mm Sci-Fi fuel tanks.  I planned to use the caps off them to hang the cages.
     I cut the rollers down to a size I felt suitable to hold a 28mm human sized prisoner, and then glued a washer to the top, and one of the ornament hanger tops, with the flanges cut down, to the top of the washer.
     I the constructed a scaffolding to hang them on, and glued that to a cut-down old CD.  I added some bracing bracket bands to the top piece using paper strips, as well as a couple wire loops to hang the cages from.
     For the bottoms of the cages I just used a couple more washers, tough on these I glued round stickers to cover the holes in the washers.  Also, on one I assembled a skeleton to represent a long forgotten prisoner, using the parts from a GW skeleton set, and an arm from a Frostgrave cultist set.  I applied white glue to the CD, and sprinkled it with sand.  Also, I attached a short section of chain to the top of each cage.  Then, when everything was dry, I sprayed it all black.
        When I sat down to paint the cages, I suddenly realized I hadn't included any kind of door n them!  (A hazard of being a cut and glue first, ask questions later, type of crafter. ;-D )  So, on each cage I carefully cut out some sections of the roller, and added two vertical bars and a balsa lock to each, to give an impression of a cage door.
     After that it was simply a matter of painting everything.     I'm really happy with these, though if I had them to over again, I think I'd make them a little shorter in size by about two of the horizontal rings.


Thursday, September 7, 2017

Frostgrave "Thaw of the Lich Lord" Bone Wheel: Simple Halloween Scratchbuild

    This past week I assembled a prototype Bone Wheel terrain piece for the "The Bone Wheel" scenario in the Frostgrave supplement book, Thaw of the Lich Lord.    Since we usually have 6-8 players in our Frostgrave Campaign games, I intend to make three more of these now that I have finished the prototype.
     The scenario describes the Bone Wheel as, "A gigantic wheel, sitting some eight feet off the ground on a central axle...the wheel is constructed of human bones, bound together with old leather straps..."   I knew there was no way I was going to make a big wheel out of 28mm bones, as it would take hundreds, so I headed to the local Dollar Tree store in hopes of finding something that would be bigger than 28mm but not so large that it wouldn't look too out of place with 28mm scenery and figures.
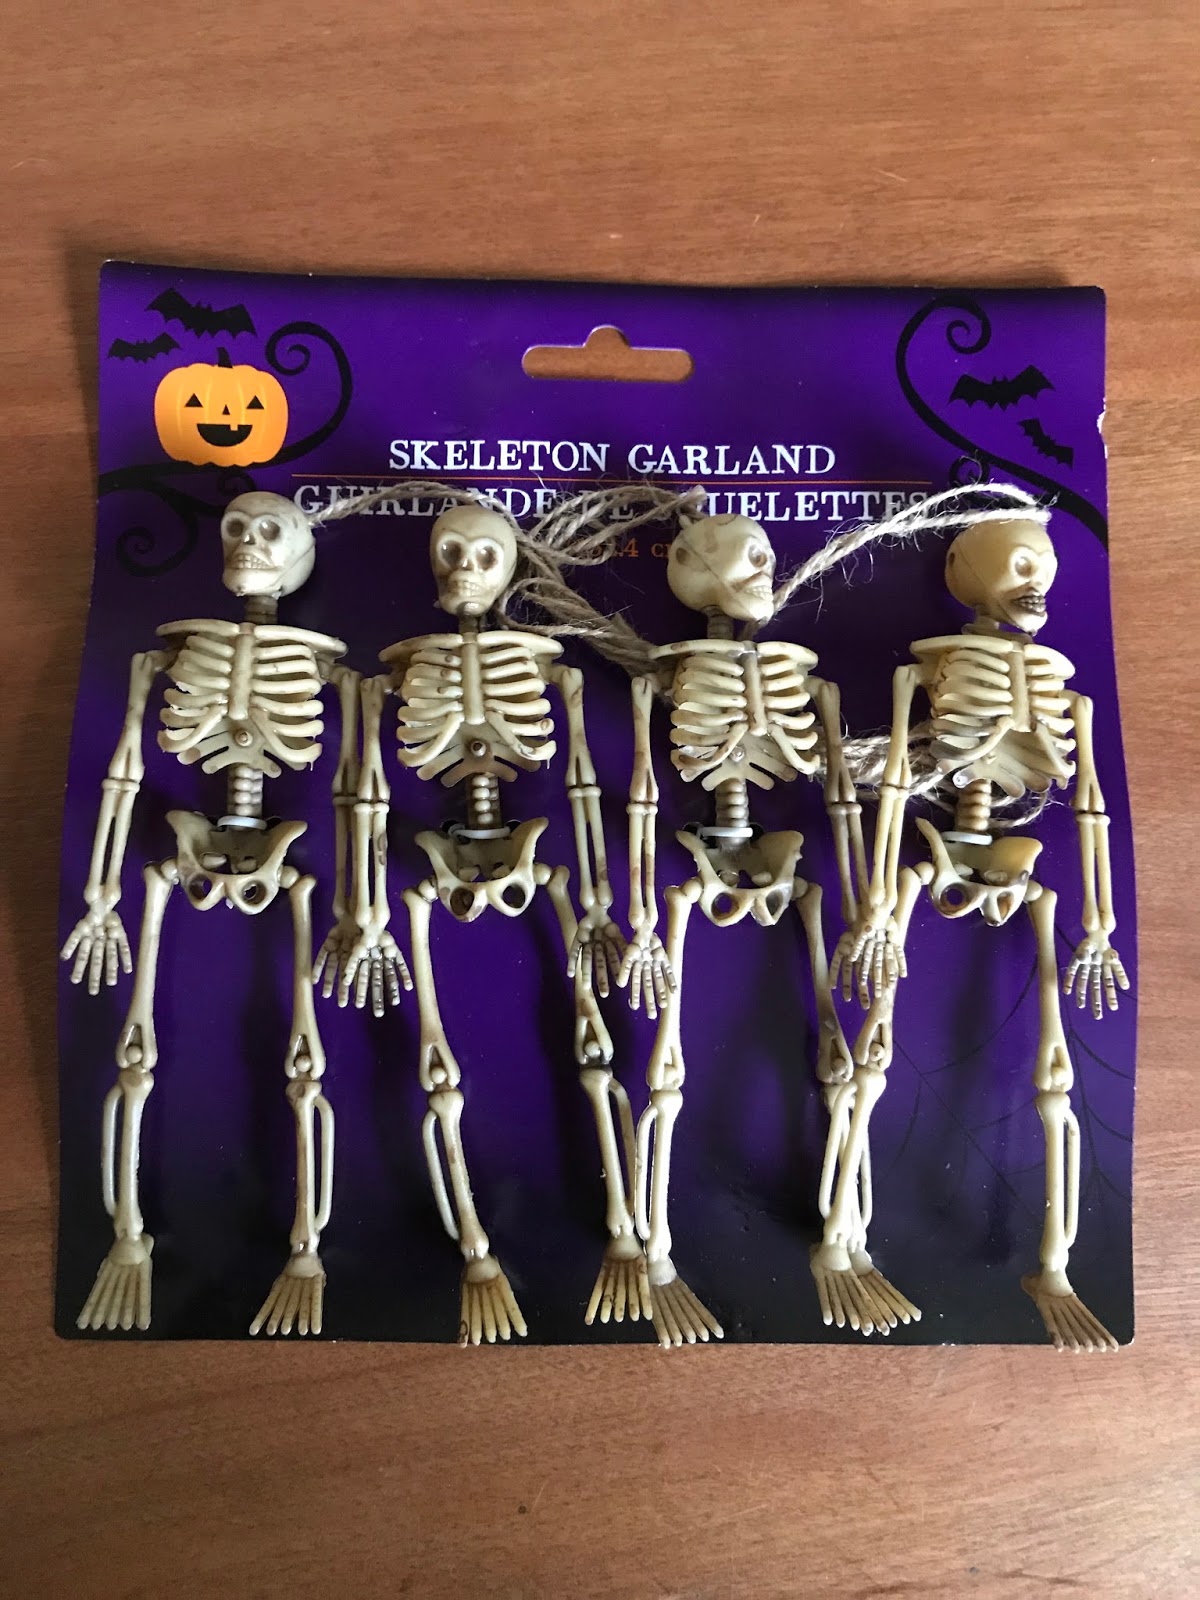
    Happily, I found a skeleton Halloween garland that looked like it would suit the purpose perfectly.
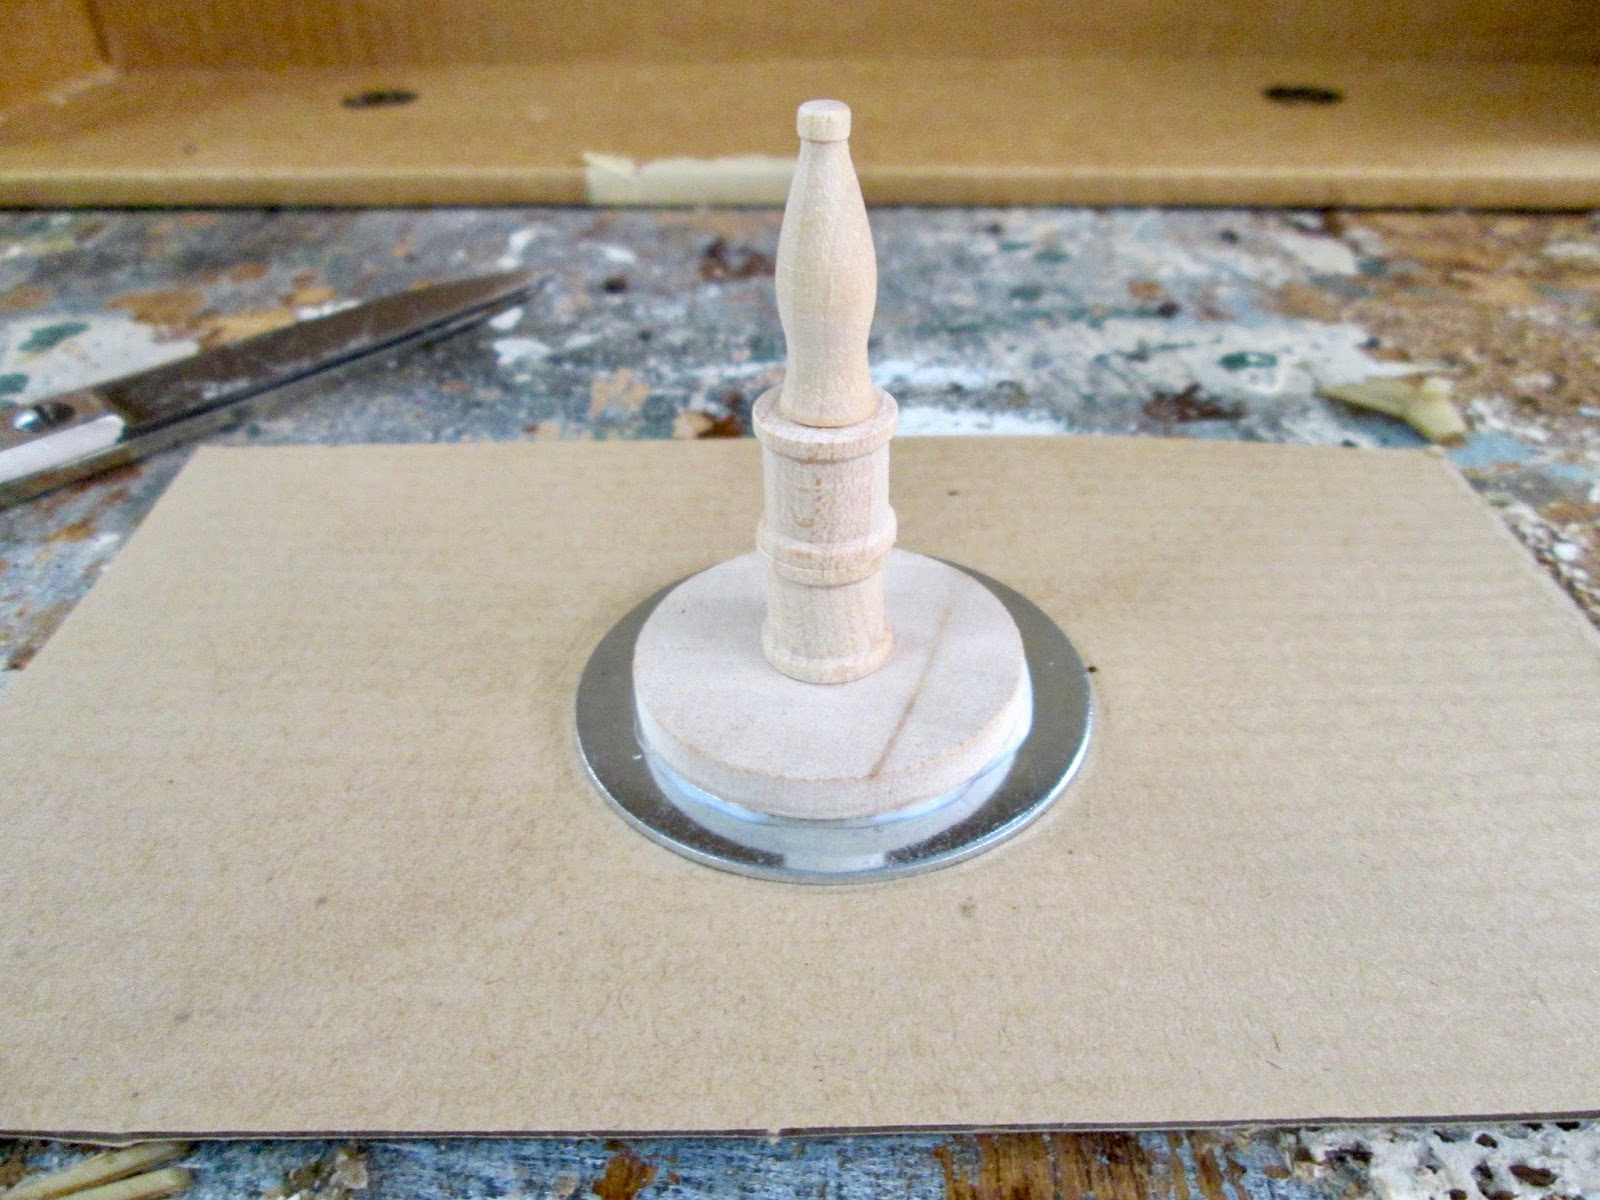
   But, before I built the wheel, I wanted to make the central axle.  So I dug through my wood bits box, and found some pieces I thought would work; a disc, a couple small spools, and a small soda bottle shape.  I glued those in a stack on a 2" fender washer.
    I then cut off the skeletons' arms and legs, and then cut the feet of the legs.    Next, I hot-glued the legs to a 1" fender washer, and then hot-glued the arms around the outer edge.
      I decided the center needed some sort of cover piece,  so I cut one of the ribcages in half, and glued that to the center.  I then did a test fit of the two parts.
      Happy with the fit, I used some of the string that came with the garland to make some lashings around the bone junctures, where the central spokes met the outer rim bones. I then sprayed the parts with flat black primer.  And, as seen in the photo below, I began drybryushing the central axle with some aged wood colors.
          It was just a matter of finishing painting everything, and then fitting the two pieces together.
Shown with a 28mm Reaper figure for scale.
    I'm happy with how the project turned out.  Since this is a scenery piece that will probably only ever be used for this scenario, I didn't put a lot of effort into it.   Still, for a quick job, I think it looks pretty good.

Friday, April 28, 2017

Quick and Easy Cardboard Game Piece Frame Sci-Fi Building Ruins.

   So, a while back I saw someone's blog entry where they made some neat Sci-Fi ruins out of the cardboard frames that are left over after you punch game counters out of them; and ever since I've been looking for an opportunity to try it.  Then, I was with a friend a while back who was punching out the counters for his newly purchased copy of the Congo ruleset, and I asked if I could have the remaining cardboard frame left after all the counters were punched out.
     I first cut the frames into sections to look like partially destroyed walls, and glued them on to 6" x 6" cork tiles.  I made one 6" x 12" base by gluing two of the cork tiles together, in order to make one larger building.  I then added a few odds and ends to the walls using some dollar store lego and other plastic bits.

 I first gave them a base coat of some old Army Painter "Necrotic Flesh" I had on hand.
     When that was dry, I gave the ruins some burst sprays of some Krylon "Aqua" Sea Glass paint I had been wanting to try out.  I think it gave an interesting "alien" effect.
     I then painted the slabs with Americana "Terra Cotta".   I think it adds to the alien look.
    I added some other colors here and there to the detail bits I glued on earlier.  Then I slathered the ruins in some Citadel "Nuln Oil" wash, using a wet brush.  When that was dry, I drybrushed them with Americans "Bleached Sand".   Lastly, I sprayed them with some matte varnish.
Shown with some Reaper 28mm Sci-Fi figures for scale.


     I'm really happy with how these turned out.  They are't too complicated or detailed, but I think they'll look good on the table.   I especially like that they're made from what would have been trash. :)

Monday, April 3, 2017

A Pair of Quick and Easy Homer Simpson Idols, Just for Fun

    Recently I saw a thread where someone made a fun little terrain piece that was an idol made from a Homer Simpson figure.  Then, the other day when I was in my local Dollar Tree store, I saw these Homer figures, and thought they might be good fodder for some Homer Idols of my own.

     The figures easily popped off their bases.  I then cut some simple rock pedestals out of some scrap insulation foam.  Next, I glued the pedestals to some round MDF bases, and then glued the Homer figures to the top of the pedestals.  I sprinkled a little sand around the bottom of the pedestals where the glue oozed out.
     When the glue was dry, I sprayed the pieces with some Krylon with Fusion Camouflage Ultra-Flat Black.  When the black undercoat was dry, I sprayed the pieces with a faux stone-textured spray paint.
   When the stone texture was dry, I repainted the pieces black again.
   I then gave them an initial grey drybrushing.
  I let the initial drybrushing dry, and then gave the lefthand one (which I plan for use in warm weather/jungle setting) some staining with a little green ink and some Agrax Earthshade wash.  I gave the one on the right (which I plan to use for Frostgrave) a little wash with a little blue ink.
   When the inks were dry, I gave each idol a final light grey drybrushing.   I then added some foliage to the greenish one.   I let them sit overnight, and then the next day gave them a spray varnish protective coat.

     I'm happy with how these turned out; not great masterpieces, but just right for a quick fun project. They will be fun to put on the table and see who notices. :)

Monday, March 13, 2017

Dollar Tree Mermaid Ghost Archipelago Terrain, Part 2

   After completing my mermaid tail arch from a air of mermaid dolls from the local Dollar Tree store, last month, a lot fof olks asked what I planned to do with the left over mermaid top-halves.  I considered this as something of a challenge, and so set about thinking about possible terrain projects to make from partially naked plastic doll halves.
   Inspired by the cover of the Ghost Archipelago cover, featuring a band of heroes facing off against a band of snakemen natives, I got the idea to make one of the doll halves into some sort of snake-man goddess idol.
 
     The first thing I needed to find was a suitable snakeman head, so I made another trip to the local Dollar Tree to see what I could find.  I wasn't able to find a plastic snake I could use, but I did find a suitable plastic lizard that had just the right head and neck pose to go atop a human torso.
   With lizard in hand, I began to construct my snakeman goddess idol.  I began by cutting down an old CD, and hot-gluing a piece of pine bark mulch to it to serve as a base.  I then cut the head of the lizard, and pulled the head off the doll.  I had to cut the neck of the doll down a little to fit the lizard head, but once things looked good I glued the lizard head in place with a liberal amount of hot-glue to help fill any gaps and blend the shape to the body.    I then hot-glued the torso to the hunk of mulch and glued the arms into a satisfactory position.
     Next, I  drilled couple holes in the top jaw to insert a couple toothpick fangs, and then used some Milliput to help blend all the joints and blend the mulch to the base.  I also sculpted a little sacrifice basin at the base of the idol, and glued some small rocks on the base. 
      When all the Milliput was dry, I gave the piece a spray with Krylon Camouflage with Fusion "Flat Black" spray paint to act as a primer.  And when that was dry, I sprayed the idol with some stone textured spray paint.
     When the stone texture was dry, I painted the idol with some Folk Art "Grey Green" craft paint, and then applied some washes of Citadel "Nuln Oil", and "Green" ink.  After that I glued some course sand to the base.  When the sand was dry, I painted that, and then drybrushed highlights on to the statue and base.  When the paint was dry, I glued some various foliage all over the base.  Then, when the weather warms up, I will give the piece a spray of Dullcote to seal it. 


    I'm really happy with how she turned out considering she was a spur of the moment make-use-of-a-leftover inspired construction. 

Monday, February 13, 2017

Dollar Tree Fairy Garden FInds!

     Anyone who has visited a craft store in the last couple store knows that Fairy Gardens have become a big thing recently.  Fairy Gardens, are little scenes you set up in a planter or other garden space, using model houses, and small decorative objects such as furniture, yard ornaments, etc., to make it look like a fairy lives in that spot.   Well, the Dollar Tree has jumped on this bandwagon with their new Spring line; and on a recent trip there, I picked up some of these goodies to see about converting them for Fantasy gaming use.
They had tree different carded sets of figures: these mushrooms, some fairies that were the usual poor Dollar Tree quality sculpting but possibly usable (statues maybe), and some little animals (turtle, butterfly frog) that unfortunately have all sorts of flowers and other bits sculpted on them (Like the gazebo above) and are a bit cartoonish.  I also got the twig and leaf gazebo shown above from the assortment of buildings they have. (Shown with a Reaper 28mm figure for scale)

Here is a shot of the assortment of structures they are selling for the Fairy Gardens.  Thye are the typical poorly painted Dollar Tree fair, but may be usable with a new coat of paint.  I may go back and pick up one of those mushroom houses to try and spruce up.

They also had these succulent sprigs that will make good jungle or sci-fi vegetation. (Shown with a Reaper 28mm figure for scale)

Friday, February 3, 2017

Scratchbuilt Frostgrave Large-Construct Garbage Wagon

   While on a trip to the local Dollar Tree store a couple weekends ago, I spotted a pack of Baby Buggy party favors that I thought would make great 28mm wagons.  As I thought about this, I remembered reading in the Frostgrave Bestiary that some Large Constructs could in fact be living wagons.  I began to form a picture in my head of a wagon with a face and arms, perhaps carved from wood; but where to get such pieces?  And then I remembered a copy of Reaper's Ice Troll I had.  The faceted nature of that sculpt would make very good carved wood looking parts.
     To start, I hacked up the figure and glued the head and arms to the wagon.  I also flipped the buggy handle to make it look more like a push handle for a 28mm sized human.   As I was working, I was thinking about what I could put into the body of the wagon to hide the smooth plastic interior.  I came up with the idea of a magically animated refuse wagon, animated by the Feldstad City Council wizards to go around the city picking up trash on it's own.  Since it thawed out after the big freeze, the Wagon Construct is now going around cleaning up the dead bodies laying around the city.  So my plan is to fill the body of the wagon with assorted debris of rotting bodies.  To that end, I soaked some tissue in a glue and water mix, and began applying that to the very bottom to represent the very decomposed stuff lying in the bottom.
     Next, I used some Milliput to blend the head and arms to the wagon's body, then I started adding some more bits to the bed.   And, I got the idea that maybe it might have some trouble telling which bodies are dead, and which quiet aren't.   So I equipped it with an axe to help handle some of the more troublesome garbage that fights back.  :)
     I filled the wagon with bits and bodies to my satisfaction, and then glued the construct to a 2" x 1.5" steel base.  When the glue was dry, I sprayed it with a dark brown camo spray paint.
    After the spray paint dried, it was then just a matter of painting it up.  When it was done, I gave it a coat of Testor's "Dullcote" spray paint.
Shown with a Reaper 28mm figure for scale.
       I'm really pleased with how it turned out!  I think it will make a fun piece to use in the game.


Friday, January 27, 2017

A Pair of Simple 28mm Sci-Fi Storage Tanks (Testing a Chipped Paint and Rust Technique)

    We bought a package of cheap plastic ornaments at Michael's this past Christmas, and I commandeered two to make a couple of simple storage tanks with the goal of trying out a chipped paint and rust technique I had seen on Youtube.
   I began by gluing the ornaments cap-down onto a pair of small plastic cups, after first cutting holes in the bottoms of the cups to fit the ornament caps into. I then glued the cups to 1.25" fender washers.  When all the glue was dry, I sprayed the finish storage tanks with flat white spray paint.
      I then painted the bases and the undersides of the tanks with Ceramcoat "Walnut", and then added splotches of Americana "Terra Cotta", to give a weathered rusted look.
      Then when the rust paint had had a day to dry, I prepared a jar of kosher salt and can of hair spray, that I had purchased a while back at the local Dollar Tree store for this purpose.
      I liberally sprayed the bases and underside of each tank with the hair spray, and while the hair spray was still wet, I sprinkled the areas with the kosher salt.
      I let everything dry overnight, and the next day I sprayed the storage tanks with a khaki tan spray paint
      I then weathered the tanks with a wash of Citadel Agrax Earthshade" wash,  applied with a wet brush, carefully so as not to dislodge the salt.  When the wash was dry, I drybrushed the tanks with Americana "Bleached Sand".
     I let everything dry overnight, and the next day I ran the storage tanks under a weak stream of warm water as I gently scrubbed at the lower ares with an old soft toothbrush, to remove the salt.  When everything had overnight to dry, I gave them a spray varnish with Testor's Dullcote.
Shown with a 28mm Reaper Nova Corp Sgt. for scale.

     I am really happy with how they came out.  They're not perfect, but it was a good learning opportunity for the process.   I'm looking forward to making some more things I can try this on.